In the music production world, compressors get all the attention.
They are potentially the most talked-about plugin you’ll hear when learning how to produce.
The word compressor gets thrown around in some form or another in just about every music production tutorial out there.
How to get louder mixes, how to get vocals to cut through the mix, tips for a bigger sounding bassline…
This list of blog articles that will likely mention compression goes on and on.
But what about levelers? In a lot of ways, leveler plugins are similar to compressors without all the confusion of thresholds, gain, and ratios.
So what’s the difference and which one should you use?
In this article, I’ll dive into exactly that!
Disclosure: This post may contain affiliate links, which means we may receive a commission if you click a link and purchase something that we recommended. Read more about Affiliate disclosure here.
The differences between leveling and compression, when you should use one over the other and a shortlist of the top leveler plugins.
Table of Contents
What is a compressor?
I won’t spend too much time on this question as there are potentially hundreds of articles and tutorials explaining compressors.
So here is my best attempt at a short, simple explanation of a compressor:
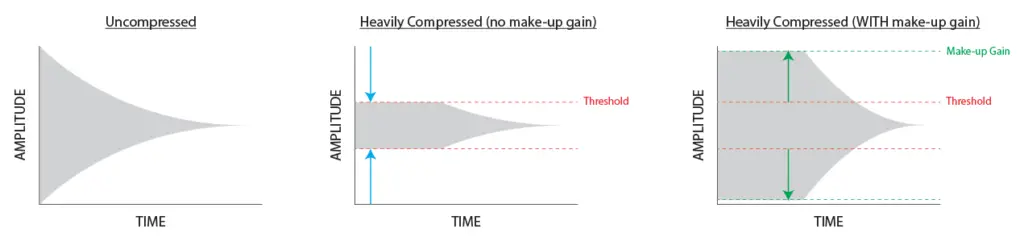
A compressor “compresses” or reduces the audio level of a track when it passes above a certain level (the threshold).
Then you have the option to increase the total volume of the compressed audio (the gain knob).
This will tame the loudest audio levels and make the lower audio levels more audible, resulting in a less dynamic audio track that’s a bit ‘smooshed’.
Here is a good graphic to reference:
Credit: edmtips.com
What is a leveler?
A leveler can achieve a similar result to compression. But it gets there in a slightly different way.
A leveler is a tool that will essentially automate volume automation. You typically set an output volume or ‘target volume level’.
And then a leveler will decrease or increase the volume of a track over the length of the recording to keep it close to your set target level.
Many levelers will have a mix/responsiveness knob that can determine how quickly it should correct the volume level.
I like to think of a leveler as my own personal mixing assistant. In the studio, an engineering assistant might have to manually draw volume automation on a recording to ensure a nice level recording. A leveler will do it all for you.
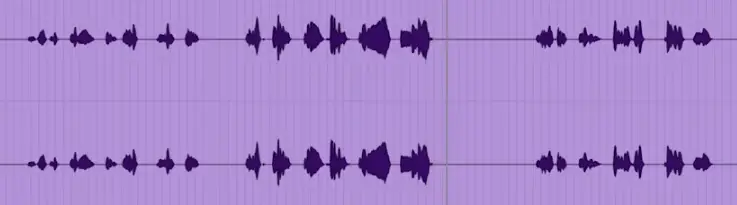
As you will see below, a leveler will create a more balanced audio signal:
With a leveler
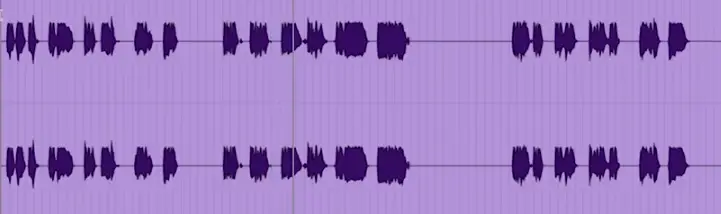
Without leveler
So you might be asking..what is the real difference?
They seem to accomplish the same thing. And truthfully, they are both accomplishing very similar results. But there are a few key differences.
Difference Between a Leveler and a Compressor: Compressor Vs Leveler
There are a few key differences to note:
A leveler can let short peaks through
Some people say that levelers are pretty much compressors with a really slow attack. And it’s true that most often, a leveler will not be as effective on short bursts of volume.
You can push compressors pretty hard, not so much levelers
Compressors, in general, are more powerful.
In the EDM world, compressors are one of the key ingredients in winning the ‘loudness war’.
Compressors allow you to really smash an audio signal and have it come out loud and in your face. Levelers simply smooth out an audio signal.
Toning down the highs and bringing up the lows. With a leveler, you’ll end up with a much more level, and less-processed sound. Which is great in some cases!
Like when you simply want to smooth out an acapella. And leaving you wanting a bit more in other cases. Like when you need to do some heavy compression on a bassline.
Compressors can change the sound of an audio track
You’ll oftentimes hear the words vintage or warm when describing a compressor’s sound characteristics.
This is because many compressors will add certain sound characteristics to a track. This is especially true for old-school hardware compressors.
This is why many of them have been replicated in digital format.
Some of the most popular compressors, like Universal Audio’s 1176, have been modeled after original hardware compressors and are loved for the subtle warmness they can add to a track.
In addition, many compressors will incorporate distortion, or drive capabilities.
Which have the ability to add some crunch to a sound and change the overall audio signal.
Levelers are used mostly for vocal clean up
Vocals are typically one of the more dynamic parts of a song.
A singer might have many highs and lows throughout a vocal recording and it’s crucial that the highs aren’t too high and the lows can still be heard clearly.
Levelers do a great job of handling the dynamics of a vocal recording. But many leveler plugins also incorporate some other great features such as “Ess” and “breath” reduction.
These features allow you to give hisses and breaths some extra noise reduction. Making the overall vocal sound cleaner.
When to use a leveler
- Levelers are best used to lightly clean something up before the true processing begins. For example, if you are recording vocals that end up very dynamic or have a lot of breaths and hisses, you can clean them up with a leveler and give them some consistency before you start putting it through your normal processing chain.
- Levelers are great for commercial applications. Things such as podcasts, commercial recordings, etc. Levelers aren’t made to create any dramatic effects or audio qualities. So commercial recordings will benefit from some simple leveling to make a recording sound consistent and professional.
- To level something out before putting on a compressor. The more a compressor has to work, the less natural the audio starts to sound. You’ll start to hear noticeable cuts of where the track is getting too heavily compressed. So if you have a track that needs some heavy compressing, it can help to use a leveler first. The leveler will prevent the compressor from needing to work so hard and allow you to still aggressively compress something without it sounding terrible.
When to use a compressor
In most cases, a compressor can be your go-to over a leveler. It typically can do most things a leveler can and more. Here are some of the most common times to use a compressor.
- When you need to tame quick transients. Vocal shouts, big cymbal hits, and other quick transients can be toned down more effectively with a compressor.
- To make the performance less dynamic. Similar to how a leveler can tame the highs and bring up the lows, a compressor can do the same. In addition, you can often get a bit more specific in your processing with a compressor. If you know what you are doing, all those confusing knobs can actually allow you to get a bit more granular with exactly how you are compressing your audio signal. As pointed out above, if you are working on an audio track that has a huge range of dynamics, to the point where you can barely hear some parts while having other parts being way too loud, then it’s a smart move to use a leveler first. Then put on a compressor.
- To make things louder. Compression is usually the go-to plugin to get whatever you are working on to sound louder. Setting the compressor settings fairly aggressively while also turning up the gain knob is the key. It’s also not uncommon to use multiple compressors on a single processing chain.
- To glue tracks together. In any production where you have multiple layers all combining to form one sound, then glue compression is key. It will bring everything together to sound more like one big sound, rather than a collection of multiple sounds. In live recordings, it allows you to reign in rogue sounds. If you are recording a trumpet section, for example, and one trumpet is playing a bit too loud, then a compressor can help tone down the loud trumpet and glue the section together.
- When you need to compress based on a trigger (sidechain compression). Sidechain compression is another huge use case for compressors. Whenever you want to duck a sound down while another sound is playing, then sidechain compression is the way to go. The most common use case for sidechain compression is when you want to duck a bass sound down whenever the kick hits so that the two low-frequency sounds don’t clash. Most quality compressors will have a sidechain input that you can set.
What are the best Leveler plugins?
Leveler plugins are a little bit hard to come by. There isn’t a ton on the market! But here are 2 really great leveler plugins to try:
ERA Voice Leveler
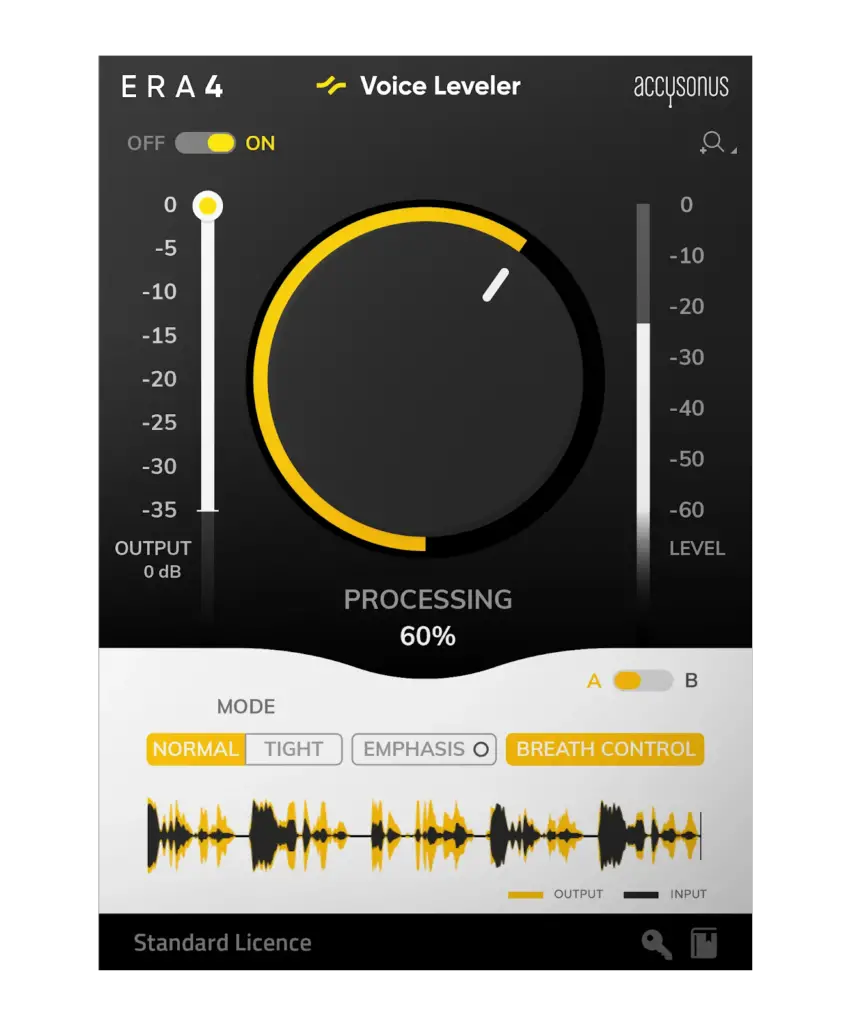
If you’ve never heard of ERA, you should check them out.
They offer some really unique plugins that help clean up poor recordings.
Like their Reverb Remover, Noise Remover, or their Plosive Remover for removing p sounds.
Their leveler plugin is great because it’s super simple.
Simply set your output level and your processing knob and you are good to go. It also has a breath control feature to further tone down unwanted breaths.
Waves Vocal Rider
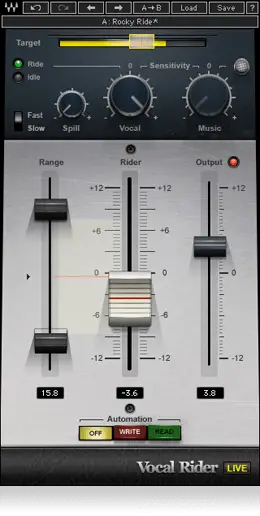
The vocal rider is exactly what you want in a leveler.
It intelligently raises or lowers the vocal gain, instantly. And unlike compression, Vocal Rider adds no coloring to the vocal track.
It also can differentiate the vocal from background instrumentation and noise, for better tracking and performance.
There you have it! I hope that you have gained a good picture of how these two plugins differ.
While compressors are much more popular, levelers still have a place in the music production world and are great for achieving a more consistent and professional audio recording!
Read also,
![Top 10 Best Audio Interfaces Under $1000 [2024 Editions]](https://www.recordingbase.com/wp-content/uploads/2022/07/best-audio-interfaces-under-1000.png)
![Finding Best Microphone For Vocals? [Top 10 List 2024]](https://www.recordingbase.com/wp-content/uploads/2021/06/Finding-Best-Microphones-For-Vocals.png)