Oftentimes music enthusiasts ask me what’s the hidden mixing strategies I use that give my projects a professional touch?
Well, literally there are many, so covering them all in one article is not possible. However, one of the most important things is implementing “REVERB” in the right way.
Yes, reverb is the effect that can make your mix better or break it. If you handle it in the wrong way.
In this article, I will cover the top 10 reverb mistakes that newbies often do. If you want a good mix then you should stop them and your songs will rock like a professional.
Read also,
Without wasting time anymore, let’s jump into those mistakes.
Table of Contents
- 1 1. You are Not EQing the Reverb
- 2 2. You are Using Long Decay Times
- 3 3. You Might be Using Too Much Reverb
- 4 4. You Might be Using Only One Reverb Plugin
- 5 5. You Are Not Adding Reverb on the Vocal
- 6 6. You Might Have Complicated Reverb Set-Ups
- 7 7. You Might Be Afraid to Experiment New Things
- 8 8. You are Adding Reverb on Every Single Track
- 9 9. You Can’t Sync Reverb With Delay
- 10 10. Sending All Reverbs to Buses
- 11 Wrapping Up
1. You are Not EQing the Reverb
Reverb is one of the sophisticated audio effects. It has several functions including, separate EQuing parameters.
These parameters help you to decide the area in the frequency spectrum in which you want to boost the reverb inside the area and reduce the reverb in other areas.
Disclosure: This post may contain affiliate links, which means we may receive a commission if you click a link and purchase something that we recommended. Read more about Affiliate disclosure here.
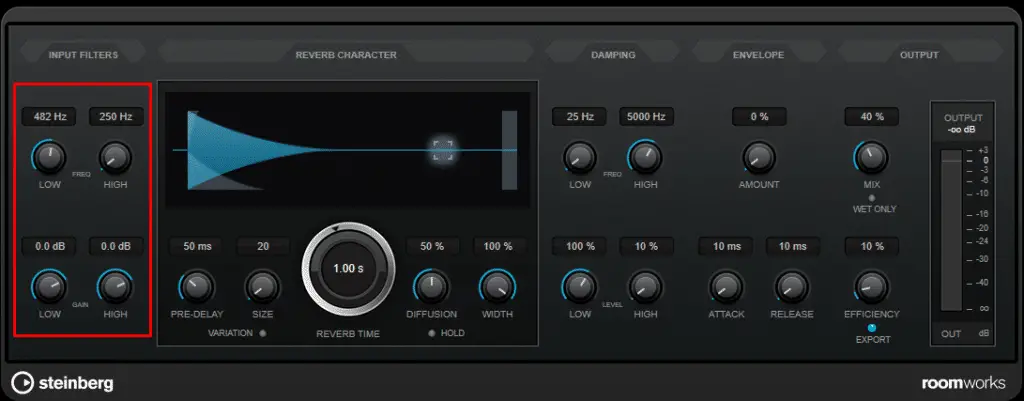
This is the native reverb plugin of Cubase 12.
Here you can see the area in the red box where the EQing parameters are located. You can cut off the low and high frequencies as well as you can adjust the gain of cut-off frequencies.
Pro Tip: If you want crisp vocals then you should cut off the low frequency below approx 400 Hz. Cut this up to -12dB and you will listen to sharp and crisp vocals.
Also, if you want to use reverb in drums then you should use this method. This will enhance the cymbals and snares and don’t let the kicks resonate.
2. You are Using Long Decay Times
Another useful parameter in the reverb effect is decay time. It allows you to adjust the decay time of the reverb.
You can use it as per your needs and instrument’s demand.
BUT, using a long decay time for an instrument can eat up other tracks. So, you should use it carefully. Don’t let it overlap on other tracks. Otherwise, you are gonna kill your mix.
Start with a short decay time as shown in the image, and gradually increase it to sync with other instruments.

Deacy time anywhere from 0.30 seconds to 1 second is ideal for percussions whereas 1 second to 3 seconds is good for vocals and other melody instruments.
However, this rule might not fit with yours. So, always try to adjust, listen and finalize the amount of decay time according to your song’s demand.
3. You Might be Using Too Much Reverb
Again, it’s related to decay time. However, some other factors also affect the amount of reverb such as pre-delay, room size, diffusion percentage, and stereo width.
If you are using them too much then you will face a high amount of reverb which could spoil your song.
If you want to get rid of this problem in a single step then I would recommend using a present. Presets are built by professionals who know the amount of these parameters.
So, first, apply a preset as per your need and then use it as a base to design your own reverb preset. You can also save yours for future use.
4. You Might be Using Only One Reverb Plugin
There are multiple reverb effects are used for various uses, tastes, and feelings. Even, I use multiple reverb plugins in my projects.
However, it’s your choice to use only one reverb plugin or multiple reverb plugins in your projects but you should keep experimenting with different reverb plugins.
Every reverb plugin has a different taste and feel. You should find your comfort level with them.
If you see the reverb plugin list in Cubase 12, you will see 4 types of reverbs there.

All of them are used for different purposes. Such as Room reverb and Room reverb SE work great when it comes to adding high-frequency reverb.
While ReVelation and Reverence, both are preset-rich reverbs. The second one is specially built for vocals and acoustic instruments.
the essence is, don’t let yourself with one reverb but expand your knowledge of using different types of reverbs from Room reverbs to Convolution reverbs, and try to make a blend of different types of reverb plugins in your projects.
5. You Are Not Adding Reverb on the Vocal
The most common mistake newbies make is not adding reverb in vocals. As we all know, the vocal is the heart of any song. Not adding reverb on vocals is just a dumb mistake because it affects the whole audio track.
When it comes to rap and hip-hop, people think they should make the vocals dry. BUT, the reality is, PROS doesn’t let the vocals dry in these genres.
They use a slight reverb in vocals to add some depth to it.
If you are a hip-hop guy I don’t suggest you leave the vocals dry. At least use a slight amount of reverb to add a wet touch to the vocals.
It is best to apply a hip-hop reverb preset and then customize it according to your needs.
6. You Might Have Complicated Reverb Set-Ups
Are you struggling with complicated reverb setups?
Maybe the parameters in the reverb plugin scare you. Or, you don’t know where to put the reverb plugins – direct or sending through Bus channels.
You should simplify your reverb setup.
I use 3 bus reverbs, one for vocals, one for melody instruments, and the last one for percussive instruments.
Also, I use some direct reverbs assigned on the tracks.
BUT, if you are a newbie I don’t recommend you to use my setup. You should do the below things, instead.
- Use one reverb bus send
- Always apply presets and then customize them (This process will save you lots of time)
- Don’t use a reverb plugin full of knobs, faders, switches etc.
I know, that reverbs have a lot of parameters from reverb decay time to cut-off frequencies, and all of them are important. Hence it’s better to play with presets.
In this article, I have repeated multiple times to use presets because they are built by pro engineers and recommended by the reverb plugin manufacturers. Chances are, those presets will fit your needs.
And if not fit, even, it’s far easier to customize a preset than build a reverb effect from scratch.
7. You Might Be Afraid to Experiment New Things
Experiments make you perfect!
Don’t be afraid of playing with effects.
Well, I know you’ll judge my words I told you above to stick with presents. BUT, applying a present in reverb doesn’t limit you to playing with the parameters.
You should always trust your own ears. You should manipulate the presets to get something new.
If you aren’t afraid of doing new things in your sound mixing then you are opening your door to becoming a professional.
Don’t treat yourself as an engineer, instead treat yourself as an artist. Because an artist has no limitations to his creation but engineers do.
So, always try to do new things when applying reverb.
8. You are Adding Reverb on Every Single Track
Adding reverb on every single track is a dumb mistake.
When you add separate reverbs on each track, the amount of reverbs will multiply. And, the track starts losing its depth.
So, I don’t recommend using reverb on every track. You should use it only there if it is applicable. Such as reverb is an essential effect for vocals.
BUT, you should not use a lot of reverb in percussions. You should also not use reverb on kicks and bass lines.
The best way to apply reverb on tracks is by sending it through Bus. You can assign a reverb effect on a bus channel and then route this reverb to the tracks.
This is the right way to use reverb because this does not kill the originality of audio but adds reverb as a different channel.
Through this setting, you will get the ORIGINAL DRY AUDIO as well as the wet audio routed to the master channel.
In Cubase, it is called the FX channel. You can adjust the amount of wet signal there.
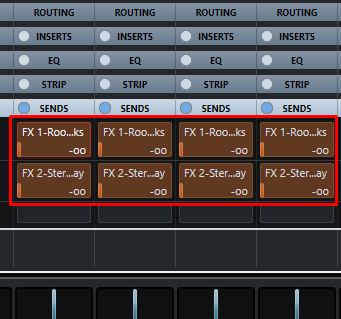
You can then adjust the reverb on the channel where you need it and leave others dry. This is the right way to process reverb and delay effects.
9. You Can’t Sync Reverb With Delay
One common mistake novices make with the reverb effect is not syncing it with the delay.
Remember, reverb has also a feature called Pre-delay which allows you to add a slight delay effect before the reverb starts.
It is just like you clap in a wide hall. You will listen to a fast attack delay effect there.
In your DAW, if you don’t sync reverb with delay, you will listen to the clashes between the pre-day and delay effects.
Also, the diffusion in the reverb effect conflicts with the delay effect.
The best way to avoid this conflict is to sync both delay and reverb with the song’s tempo. Morden DAWs have this feature that you can do by pressing just a button on the transport panel or the effect plugin dashboard.
10. Sending All Reverbs to Buses
Now you will ask if I was advocating adding reverbs through bus channels then why am I saying not sending all reverbs to busses?
Well, when it comes to experimenting, there are no hard and fast rules. You can send some of the reverb to buses while also using some reverb directly on the track.
It all depends on your needs. You should point out what your song is demanding and act according to the call.
My recommendation is to use both bus reverbs and direct reverbs in your song to make a perfect blend of reverbs.
BUT, don’t overdo any of the approaches. If you will send your reverb through the bus then you will end up getting dry audio.
On the other hand, if you use only direct reverb then you will get only wet audio which could destroy the depth.
Take your time to evaluate every subtle change when you apply reverb on the tracks and find the middle way path to get the best result.
Wrapping Up
When adding reverb, it’s important to think about how each individual track will be affected. Too much reverb on every track can quickly make a mix sound muddy and cluttered.
It can be helpful to add reverb to specific tracks sparingly in order to create more space and clarity in the mix. Experiment with different settings and placements to see what sounds best for each individual track.
When using reverb, it’s important to keep in mind the size and shape of the room you’re trying to simulate. Different reverbs will produce different results, so it’s important to find the one that best suits the sound you’re going for.
You should be mindful of the wet/dry balance when using reverb. Too much wet reverb can quickly make a mix sound muddy, so it’s important to find the right balance between wet and dry signals.
Finally, when using reverb, it’s important to sync the effect with the tempo of the song. This will ensure that the reverb doesn’t clash with the other elements in the mix.
I hope you enjoyed reading this post. If you have any questions or suggestions, please leave a comment below.
Happy mixing!
You might also like,