In this article, you’ll know what is audio clipping and some good tips to avoid it in the recording. So, read the full article if you are facing clipping in your soundtracks.
Music recording is not just an art but a science. We need a good knowledge of sound theory to become a good recording and mix engineer.
I’m not saying you get a degree in sound theory, but you need at least some basic knowledge of sound to start your carrier in it.
Read also,
When you dig into audio recording technology, there are several terms you’ll encounter with. One of those terms is “Audio Clipping”. Audio clipping is like a nightmare for a recording engineer as it will ruin your audio track if not handle with care.
Today we know all about audio clipping in music production and get tips to remove it.
Well, now let’s start the topic…
What is Audio Clipping
Let’s understand it with a real-life example. Have you ever raised your TV volume accidentally? If yes, then maybe you’ve encountered with audio clipping.
Disclosure: This post may contain affiliate links, which means we may receive a commission if you click a link and purchase something that we recommended. Read more about Affiliate disclosure here.
When the TV volume increased after a certain level the audio starts deforming and the resultant audio you listen to is distorted and cracked.
Why does it happen?
Here is the answer…
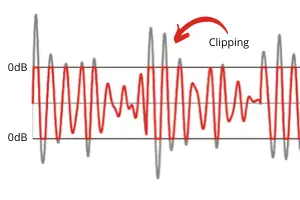
When an amplifier pushed beyond its maximum limit, the sound-wave generated, jumps the ideal audio mix level; 0dB. At this level, the audio signal causes the amplifier to produce an output voltage beyond its capability, hence clipping occurs.
Clipping is also called as overdrive.
Why Avoid Audio Clipping
There are 2 reasons why you should avoid audio clipping in your mix.
- It affects the quality of the mix.
- It can damage the speakers.
Audio clipping affects the quality of the mix
Do you want to listen to crack audio? Probably not, we all love high-quality soundtracks. Hence all the technology transformation in the audio recording field.
A soundtrack with clipping deforms the sound hence what you listen to is over-driven audio, which affects the quality of the audio track. Avoiding audio clipping is a good practice to create high-quality soundtracks.
Audio Clipping can Damage The Speakers
The 2nd reason is, a soundtrack with audio clipping can damage the speakers.
When a soundtrack with audio clipping played in a sound system for a long time, it can overheat the transducers and drivers, which can cause potential damage to speakers.
However, today, many speakers are equipped with safety features, like limiters.
But as a recording engineer, we must avoid clipping in the first place.
How to Avoid Clipping in Recording and Mixing
Now you have the basic knowledge of audio clipping and why avoiding it in your mix is so important? Now its time to discuss, how to avoid clipping in recording and mixing?
In this section, you’ll learn 4 best practices to avoid and control audio clipping in recording and mixing.
0dB barrier
If you are not new in audio recording, probably you’ve learned about it.
We measure the strength of audio signals in dB. Such as, in audio pollution meters you can see dB calibrations from 1 to 160. That’s positive values of dB.
But in audio recording, dB value is measured in negative such as -20dB, -6dB, etc and the peak volume level is called 0dB.
Here begins the game of 0dB.
As 0dB is the peak in mixing, we need to maintain the volume level of all the tracks below this level. If something goes above, overdrive occurs, hence clipping.
So, the first and most important tip to avoid audio clipping in mixing is to maintain audio levels below 0dB.
However, most of the DAWs and mixing consoles have 4dB headroom over 0dB, it’s good to keep that headroom vacant for mastering.
Now you know all about the 0dB barrier that should not be crossed during recording and mixing.
But how do you do that?
Here it is…
Control Input signal
Avoiding audio clipping at the very first stage comes into the best practices for a mix engineer.
You should control the input signal at the time of recording so that it could not go beyond the 0dB level.
When you are setting up the miking and faders, make sure the fader signal shouldn’t go above -2dB at the highest level of the instrument. For that, you can ask the player to play the instrument loudly while setting up the fader level.
Somewhere around -6dB you will get the sweet spot.
If you go above the -2dB peak level then chances are you would get clipping in the signal. However, there are plugins available to minimize clipping, I recommend to avoid it as more as possible at the very first stage, ie; input.
Use Compressor and Limiter Plugins
As I’ve told you above to minimize the clipping at input while recording, compressors can be used to maximize the dynamics of the audio without clipping occurs.
Compressor and limiter plugins can do magic when it comes to clipping. But you need some extra knowledge of Compressors and Limiters to use them properly.
Here are some articles to gain knowledge about them
Setting up compressors and limiters is a tough task for beginners so as a beginner, you can use presets for it.
Do you need some cool compressor plugins?
checkout this article…
Use Clipping Remover Plugins

The 4th tip to control audio clipping in your soundtrack is using clipping remover plugins.
Clipping remover plugins are the special plugins used to balance the sound wave gone above the 0dB barrier at the time of recording.
When the case is you accidentally recorded audio with clipping, then you should use these plugins to avoid clipping in the final track.
Clipping remover plugins are special limiter plugins with a very fast attack. The fast attack catches the clipping very fast and makes it down under the barrier.
But there is a demerit of clipping remover plugins.
The quality of the audio may go down then original.
Well, here are some clipping remover plugins you can use…
Conclusion
Clipping is a bad thing for a good mix and recording engineer. You should avoid it at the very first level of recording. You can use the sound staging process to get the input clear but clipping free.
Compressors and limiters are great tools to avoid clipping and maintaining the dynamics side by side. You can use clipping remover plugins to control the clipping if it’s accidentally added to the track.
You can also use the Adaptive limiter in the master channel to improve the dynamics of the overall track while avoiding clipping.
There are several ways to make it happen. You just need to open your ears and eyes to learn new things. Ultimately you will get clipping free tracks in your hands.
Comment below if you have some other ideas to avoid audio clipping in recording and share this article with your social channels so that others could learn to avoid clipping in their audio tracks.
Read also,