If you want to come up with better mixes, you must understand the gain staging process. Underestimating it may lead you to compromise the whole recording and mixing without even realizing it.
The digital audio recording world is changed today. Back in the initial days of digital audio recording, there were quality-related problems as compared to analog recording.
But with time we conquered many of those problems.
Today there are tones of analog modelled plugins available in the market as well as today’s audio interfaces, DAWs got rid of most of the digital domain problems.
But even the quality improved, many of us still find our mixes unsatisfying.
Why? What is the problem behind it?
Well, there are obviously many wrong things we do in our everyday recording and mixing life and blame the digital domain for the poor quality.
If we will take care of these things, we can come up with better mixes.
Disclosure: This post may contain affiliate links, which means we may receive a commission if you click a link and purchase something that we recommended. Read more about Affiliate disclosure here.
You might also like,
- Best Bass Guitar Mics in 2024: Ultimate Guide
- Top 10 Best Audio Interface for Streaming Under $200 in 2024
And, one of those things is Gain Staging.
Table of Contents
What is Gain Staging

Gain staging is a process to maintain optimal audio signal levels throughout all the devices used in the audio recording process to maximize the signal-to-noise ratio.
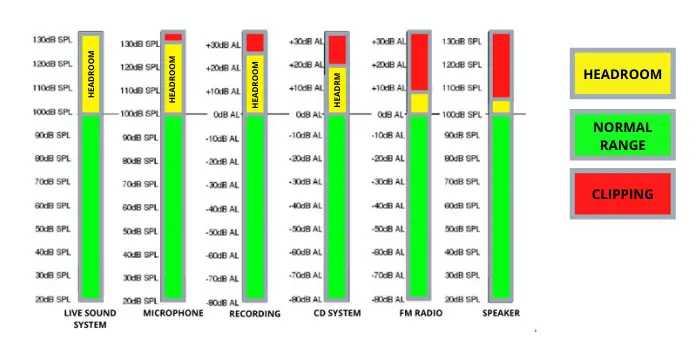
In the audio recording, there are two main things we must aware of if we want to maintain a healthy and clean signal.
Headroom is the room available in the upper area of the signal where we can play with the audio to get the maximum possible loudness.
The noise floor is the noise in the signal path which comes into existence due to some devices used in audio recording as well as AD/DA conversion and some other reasons.
The goal is to keep your audio signal as high above the noise floor as possible for a higher signal-to-noise ratio. This whole goal can be achieved by Gain Staging.
This video will help you understand Gain Staging.
Why Gain Staging is So important in Mixing
If the signal-to-noise ratio becomes low, the chance is you get the resultant audio with an audible noise. Have you ever listened to the cassette player with a crappy Play-head?
If yes, you would have listened to the noise in the audio due to the crappy condition of the Play-head.
The reason is, due to the bad condition of the Play-head some noticeable noise was added to the audio and the signal-to-noise ratio became low.
Well, that was the old day’s matter. The question is, is there a noise floor that existed today in the digital audio recording?
The answer is yes.
Whether it’s a digital audio recording or analog audio recording, the noise floor exists in both domains and we can’t underestimate that thing.
If we want a clear loud output, we must gain stage in all the stages of audio recording.
Digital Gains Staging Vs Analog Gain Staging
However, in digital audio recording, most DAWs got rid of system noise hence the noise floor is very low. But still, gaining staging is very important in digital recording.
If you want a good loudness in output, gain staging is important, whether it’s a digital audio recording or analog audio recording.
The basic process of gain staging in analog and digital audio recording is the same. You must maintain good levels in all these stages of the audio recording process.
- Mic/Instrument input preamp
- Faders
- Plugins and external effects
- Send and return levels
- Master volume level
We will get back to the whole process of gain staging in the audio recording below in this guide but before you should know the basic components of the gain structure.
Components of Gain Staging
In this section, you will get to know the basic components of the gain structure so that when you go with the process of gain staging, it would be easy to execute.
Gain Stage
The gain stage is the point where the signal of the source is amplified by an amplifier.
The most important point is your mixer or audio interface’s preamp where the input signal of an instrument or vocal is amplified.
There are several other gain stages that impact the signal level including the fader of the mixer or the input volume knob in the audio interface, plugin’s input and output volume in DAW.
DAW mixer’s faders, send and return levels. These all are the stages where the signal gain can be amplified.
Noise Floor
Noise floor is the point in the audio where the noise is louder than the audio signal. The more you amplify the signal in the gain stages the more noise floor increases in the audio.
Distortion (Clipping)
Distortion or clipping occurs when you amplify the input signal above a certain level and overload the gain stage.
In audio interfaces or mixers, you must set the level below that level to avoid distortion and clipping.
In DAWs, clipping can occur in other gain stages too, such as in mixer faders, plugin input, and output stages, etc. So don’t overload these stages too. Keep the level below the distortion level.
In digital recording, the maximum level is allowed 0dB in any gain stage.
But keeping the signal around -6dB to -10dB is a good practice as it prevents overloading as well as maximizes the signal to noise ratio.
Peak & RMS
For a proper gain staging in audio recording, you must understand these terms. RMS or Root Mean Square is the average loudness of a sound source.
Where Peak is the loudest part of a given sound clip.
In gain staging, you should maintain a good RMS level. At the same time, you must take care that the Peak level should not be clipped.
For example, let us suppose you are recording acoustic guitar. In an acoustic guitar, the peak level is the strumming part in the signal and the overall loudness from the strumming to the sustain is called RMS.
Here you must maintain a good input RMS signal as well as always see if the strumming part that is Peak of the signal is not clipping.
Signal-to-Noise Ratio
Signal-to-Noise ratio is another important factor in gain staging.
It’s the proportional amount of dB between the nominal operating level and the noise floor of the audio signal. The higher the signal-to-noise ratio you have, the lower the noise is.
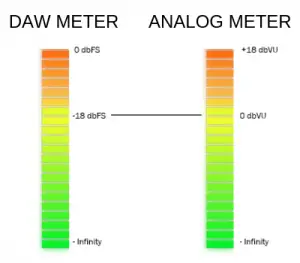
What is Headroom
Now it’s the most important and debated part of the audio recording field. In general, Headroom decides the loudness of the audio signal.
However, in some cases, it’s not true. Even it is one of the most important things in audio recording. Let us know what is headroom?
Headroom is the difference between the RMS (Nominal Operating level) and the clipping level.
Less headroom means more loudness while more headroom means less loudness.
Every instrument has different headroom. Like, the headroom of an acoustic guitar is more than a drumset.
The reason is simple in an acoustic guitar, we have a big difference in loudness between the strumming part and the sustain.
So its headroom becomes more but in drums, the loudness difference between the hit and sustain is not much as in acoustic guitar so it has less headroom.
The dynamics and other effects we use in our DAW or via the external effect board also affect the headroom of the sound signal.
Proper gain staging is maintaining the perfect balance between loudness and headroom.
Unity Gain
Maintaining the unity gain is very important if you want a proper gain staging in your project.
When you neither boost nor cut the incoming signal in a piece of equipment it’s called Unity gain.
Let us consider you have applied a compressor plugin to your track in DAW. Probably you will notice the gain changes after applying the plugin.
This happens because the compressor boosts the input gain.
The work of a compressor is not boosting a signal but compressing the peaks for better loudness.
So you must maintain the same input level and output level to unite the gain structure.
Signal Chain
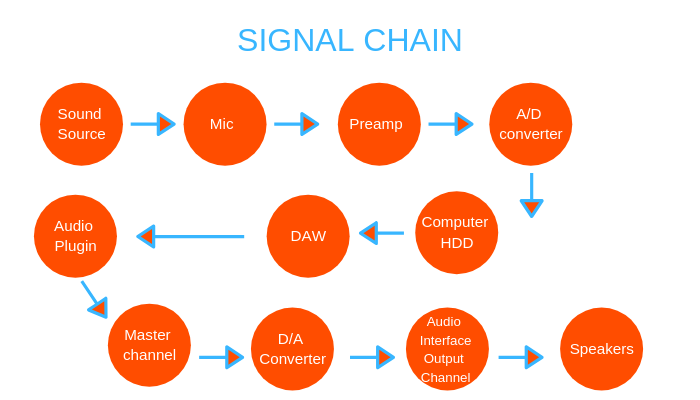
Understanding the signal chain helps you to get good gain staging in your mixes. As simple as it is the route or order in which sound signal flows throughout your project.
The image shown below can give you basic knowledge of the signal chains in your DAW.
Let us suppose we have recorded an acoustic guitar. Now here is the signal chain of the acoustic guitar you have recorded.
- Stage 1 – Audio signal captured by the microphone
- Stage 2 – Signal flows from the mic to the preamp of your audio interface you have connected with the mic to get the signal into line level.
- Stage 3 – Then this signal converts from analog to digital form in the A/D converter of your audio interface.
- Stage 4 – The audio signal of that guitar is then recorded on a hard disk in your computer with the help of your DAW.
- Stage 5 – Here if you use a plugin in your audio track or an outboard effect processor through send and return then the audio signal goes into the plugin then comes back to the same audio track or in case of the using aux send and return it goes to the separate aux channel and then to the output channel.
- Stage 6 – The dry signal goes directly to the output master channel.
- Stage 7 – In this step, the signal from the master channel goes to the D/A converter of your audio interface and once again converts from digital format to analog and then on to the output channels of the audio interface.
- Step 8 – This output signal feeds the speakers and monitors joined with the output of the audio interface and finally arrives into your ears.
To get a better mix, you need to maintain good gain staging in all stages shown above.
Seems difficult?
Don’t worry in the next section we will learn the process of achieving that good gain staging. Keep reading.
Gain Staging in DAW: The Process
Well, above you get the knowledge of the main components of Gain staging as well as the signal chain in your DAW.
Now you know all of these things, it’s time to know the most important part of this article – The process of Gain Staging.
In DAW-based recording, we need to know 4 types of gain staging.
- Input level gain staging
- Fader-level gain staging
- Plugin level gain staging
- Gain staging in send and return
1. Input Level Gain Staging
Wrong Preamp Setting
Preamp and line inputs play an important role in gaining staging. It’s the first stage where the audio signal enters the recording system. In input-level gain staging, we should maintain a good level so that we could have a well-amplified audio signal.
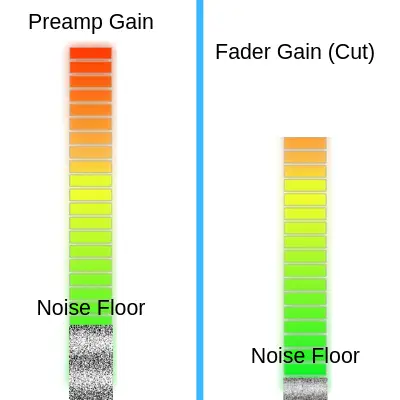
Right Preamp Setting (Using pads to cut the gain in fader)
In input level gain staging we should take care that neither the gain is too low nor too high.
- If you record an audio signal with low gain then SNR(Signal to noise ratio) becomes also low and when you amplify this signal in the system, the noise also increases.
- On the other hand, if you record your audio with high gain, the chance of getting distortion and clipping becomes higher. Find a good level where there is no clipping and distortion as well as a good level of the input signal.
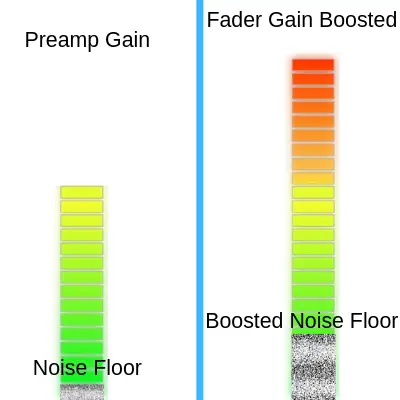
2. Fader Level Gain Staging
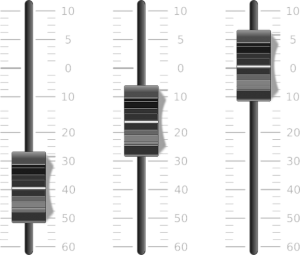
Faders are the second main component as the whole balancing of the project depends on the mixer/DAW channel faders.
When your signal is well amplified from the input, you can play with the fader pads and other filters to balance the audio signal level. But don’t decrease the level too much.
Always maintain the level between -6dB to -10dB RMS. Metering can help you a lot in balancing the fader levels.
Keep in mind that whenever gain increases in the system at any stage, the SNR (Signal to noise ratio) decreases.
So the best practice is to get as much boosted signal as you can from the preamp and line input.
3. Plugin Level Gain Staging

The 3rd important gain stage is plugin-level gain staging. It is the most confusing part of gain staging as many newbies recording engineers don’t know exactly how to achieve the plugin-level gain staging.
In fact, I saw many of us are using compressors as gain boosters. They apply those compressors to boost the input gain and think that it is shaping the dynamics.
Every plugin(exceptions are always there) has two gain-setting channels. Input gain and output gain. When a signal enters the plugin, it tends to increase the gain of the signal as in the default setting.
Especially with dynamic plugins such as compressors, limiters, etc, it’s very obvious. To maintain a perfect gain staging, you must maintain the output gain so that it could not amplify the input gain.
To do this perfectly when you applied all the settings on the plugin, just bypass it and listen to the gain change.
If the gain is reducing, that means the plugin is amplifying it. So adjust the output gain control to get the non-amplified signal. That’s it.
Various plugins are used for various purposes. For gain amplification, there are special plugins excited. Don’t use a compressor or limiter for that purpose.
4. Gain Staging in Sends And Returns

Generally, Sends and returns are used to send the signal to an external effect processor and then return via an aux track to mix up into the master output.
In DAW we use this feature for applying reverb sends via reverb plugins.
In this stage, we send a second signal to the send channel. When it returns and mixes up into the master output, the resultant signal becomes higher in gain.
The reason is simple, we get two separate versions of the exact signal which boosts the resultant signal together.
When you use send channels, always use send fader or knob to lower the send signal by listening to the track so that it could be not lower than your need but also could not amplify much the master channel.
You can also use the plugin input and output controls to set up the perfect gain stage.
5. Leave Some Room For Mastering
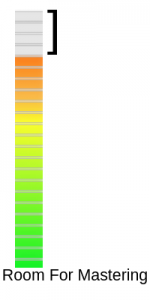
By gaining staging at every stage you must take care of that we also want some room for mastering.
In mastering the mastering engineer(some recording engineers DYI) needs some room for applying their plugins and effects on the track. So make sure you leave at least -3dB room for the mastering.
Do not cross the -3dB threshold nor in mastering, you will get distortion and clipping.
Key Points of Gain Staging
Can You do it After Mix?
Gain staging can be done after mixing though I never recommend you to do it after all your mixing work is done.
Always try to keep it upfront when you are mixing your projects.
Fader Automation
Don’t automate the faders if it’s not the demand of the project. Otherwise, you will end up with the wrong gain stage after the mix.
Kick and Bass Levels
Always set the kick and bass levels first. These two components are the foundation of a song so you should always setup their levels before any other instrument. This way you will get the proper gain stage.
The Role of High Quality Audio
When it comes to gain staging, high-bit depth audio has more room than lower ones. So I would suggest recording in 24-bit format which enhances the quality of audio and give you extra headroom for gain staging.
Conclusion
In the Golden days of audio recording, when the noise was higher as compared to today, gain staging was a must-do process for recording engineers.
But even today we have devices with extra low noise, gain staging is needed for better output.
Today we can see gain staging with other aspects that in digital recording the headroom is not as higher as in hardware recording.
Gain staging gives us more headroom in digital recording to compete with hardware alternatives.
Apply gain staging with your tracks and see the difference. If gain staging improves your recording, let me know by commenting below.
Share this article with your friends and recording enthusiasts to help them grow in their musical careers.


Thanks So much brother,Am really greatful :I wish a lot will no this site and learn from you