Do you have an XLR mic but wondering how to connect an XLR mic to a computer?
Well, you are not alone, several people daily search on Google how to do this.
Don’t worry, in this article, I will show you the three different ways to connect XLR microphones to which computer or laptop.
How to Connect XLR Mic To Computer
Nearly all the computers come with a built-in microphone input port. So it is possible to connect a mic with a computer BUT, they do not support all types of mics.
Most of the time you will get a 1/8″ phono input port which is rarely available on any mic.
And, the worst thing is the inbuilt sound card is really crap.
It does not support condenser mics or even heavy professional dynamic mics.
SO, I have shared three different methods to connect your existing mic to a laptop or computer.
Disclosure: This post may contain affiliate links, which means we may receive a commission if you click a link and purchase something that we recommended. Read more about Affiliate disclosure here.
Whether, you are a Youtuber, video maker, or musician, it would help you to connect a mic to the computer and record some good sessions.
Three Methods to Connect XLR Microphone to a PC/Computer
Well, without wasting our time, let’s jump into the methods.
Method 1 – By Using XLR-to-USB Signal Adapter (Works only for Dynamic Mics)
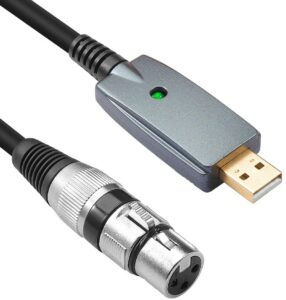
The first method of connecting an XLR mic to the computer is by using an XLR to USB signal adapter.
These adapters are cheap and widely available in the offline and online markets.
Here are the steps to connect your XLR mic to a computer through the XLR-USB signal adapter.
- Connect your XLR mic’s female port to the XLR male port of the XLR-USB signal adapter.
- Now connect the USB side to any of the USB ports of the computer.
- Now, open your computer’s sound settings and you will see a new mic input there.
- Enable the input and your XLR mic is ready.
BUT, you can’t connect your condenser mic through this method. Because, condenser mics need 48+Volts phantom power, which is not available on USB ports.
With this method, you can only connect dynamic XLR mics to a PC.
That’s where the second method comes into place.
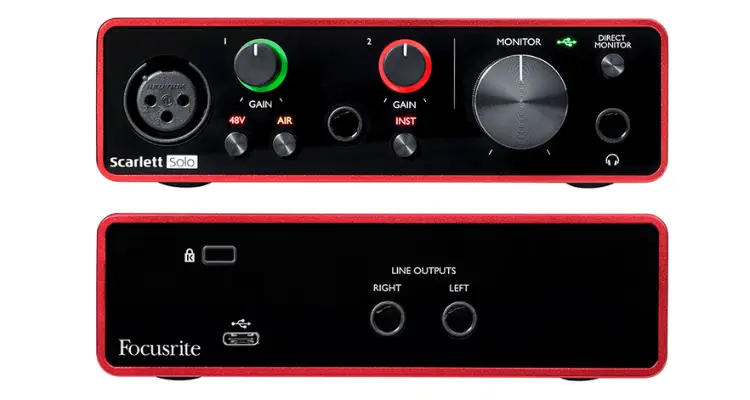
Method 2 – Connecting XLR Mic to a PC Using an Audio Interface or Mixer (For Condenser and Dynamic Mics)
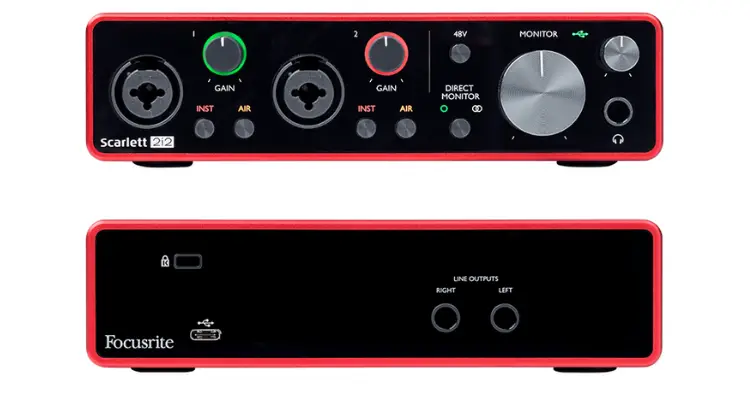
The second method is to get a professional audio interface that supports 48+Volts phantom power and connect your condenser and dynamic mics through that.
There are several types of audio interfaces available in the market, and it’s confusing for a newbie to select the best one.
SO, I have a bunch of articles and guides to help you with that. Such as,
- Top 10 Best Audio Interface for Streaming Under $200 in 2023
- Top 10 Cheap Audio Interface Under $100 in 2023
- 9 Best Audio Interfaces You Should Buy For Your Home Studio in 2023
- How To Choose Audio Interfaces in 2023 [Ultimate Guide]
With the help of the above articles, you will be able to select an ideal audio interface for you.
The basic setup is as follows,
- You get a USB audio interface that supports 48+Volts phantom power input and has XLR port for mics.
- (Optional) Install the software on your computer given in the audio interface box or downloaded from the audio interface’s official website.
- Now, connect one end of the given USB cable to USB audio interface and the other end to any of the USB ports of your PC.
- Now, connect your condenser XLR mic to the XLR port of the USB audio interface.
- Switch on the phantom power button and your setup is ready to record through the mic.
Well, I have already provided the articles and guides to help you buy the most suitable audio interface, Focusrite Scarlett Solo is my recommendation if you are a newbie or just a music freak.
okay, now it’s time to uncover the 3rd and the cheapest method.
Method 3 – By Using XLR to 1/8″ TS Microphone Cable Converter (Works only for Dynamic Mics)
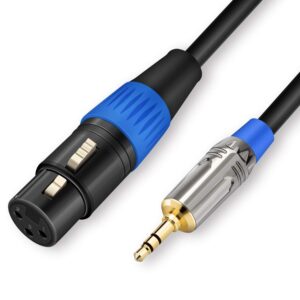
Before sharing this method, let me tell you that this method only works with dynamic mics. As the in-built sound card of a computer does not support 48+Volt phantom power, you can’t connect any condenser mic through this method.
SO, don’t try to connect condensers through this method or you would end up with a damaged sound card.
There are several XLR to 1/8″ TS connectors available in the market. You can search on Amazon by typing “XLR to 1/8″ TS” or simply click here to explore all the XLR to 1/8″ TS connectors on Amazon.
- After getting the connector, you need to connect your mic’s female XLR with connector’s male XLR.
- Then, connect the TS side of the connector to the mic input on your computer.
- Open the sound settings on your computer and enable the mic input option.
- Now your mic is connected to computer.
Note: Computer sound cards are not so powerful so you can’t get the desired sound level as compared to a dedicated audio interface. You might also get some noise on your audio due to the low-quality sound card converters.
How to Setup the Mic Input on your laptop or Computer
Have you connected your mic with your computer through an adapter or an audio interface yet you are not getting the mic sound?
Maybe you’ve not set up your mic inputs on your computer.
SO, you need to set up mic input on your laptop or computer.
If you have a dedicated audio interface then your sound setting will be different so I would come to this topic later in this section. Let me first talk about the basic computer sound settings.
To set up the mic inputs correctly you need to first find out the sound settings option in your computer. I will show you the Windows Computer sound settings. If you have Mac or Linux you can search on Google for that.
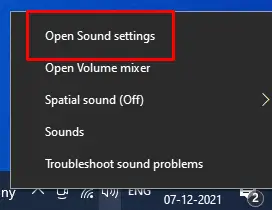
Here are the steps to enable mic input on the Windows sound setting.
Step 1: Right-click on the sound icon on the taskbar.

Step 2: You will see the default mic in the image below. I don’t have any mic connected so it’s showing no input device found. But when you connect a mic it will show that here.
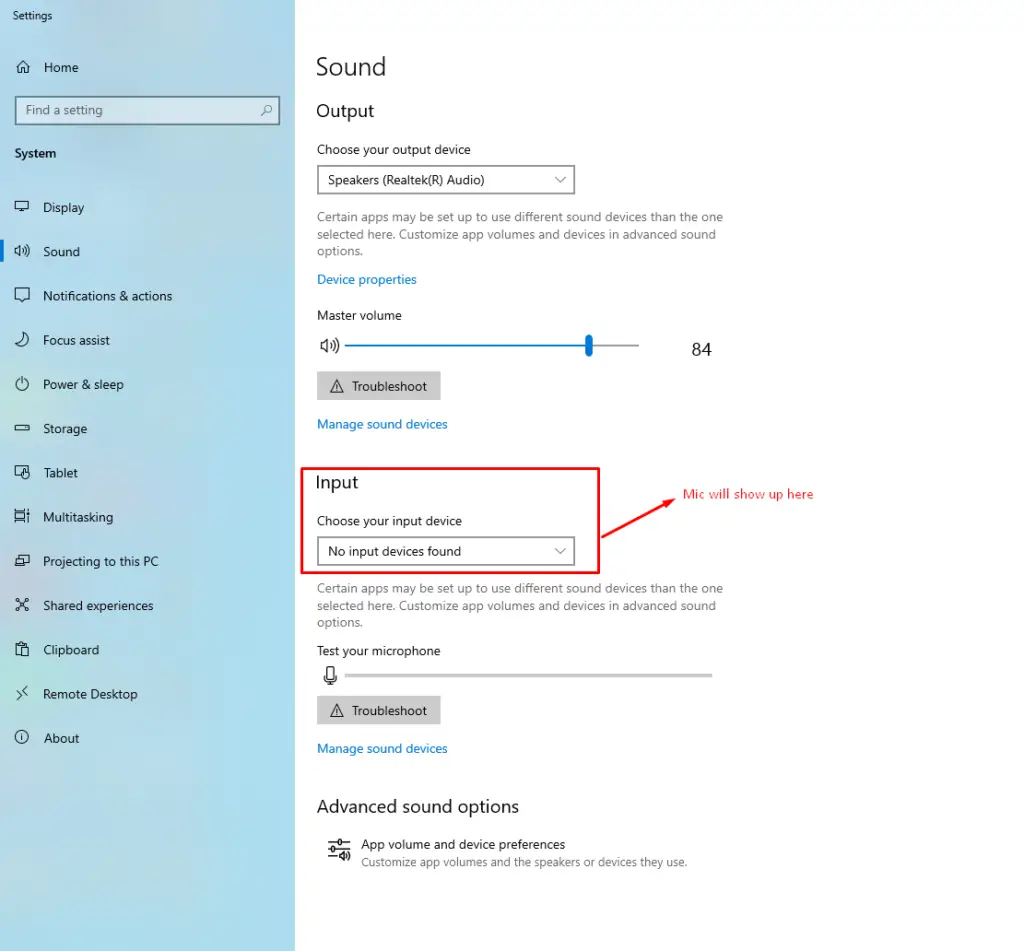
It will automatically enable the mic.
You can adjust the mic volume from the “volume mixer” which you can access by right-clicking on the sound icon in the taskbar.
If you have a professional audio interface connected with your computer then the setup will be different. Every audio interface has different software and settings. So it’s better to refer to the audio interface manual.
That’s it.
Conclusion: Connect XLR Mic to Computer
So, here were the three most common methods to connect XLR mic with computer or laptop. You can use any of them to connect your XLR mic with your PC.
If you are facing any problem in connecting XLR mics with your computer then let me know in the comments. I will answer all your queries.
Cheers.
You might also like,


![What is Microphone Gain [Complete Guide About Microphone Gain]](https://www.recordingbase.com/wp-content/uploads/2022/01/microphone-gain.png)
