Do you know? Recording studios are one of the most sensitive places in the world. You have to protect recording equipment from dust and humidity nor they would not last long. But apart from traditional cleaning, studio equipment need extra care in the process of cleaning.
Monitor speakers are a very important part of your recording gears. Just like other electronic equipment, they need care and cleaning. If you own a recording studio, you should know how to clean studio monitors so that they can last long for years.

In this guide, you will learn the proper process of cleaning studio monitors. There are several steps to properly clean your studio monitors.
- Cleaning woofer cone
- Clean rubber surrounded the woofer cone
- Tweeter cleaning process
- How to fix Pushed Tweeter Dome
- Cabinet cleaning process
- Fixing a scratch on the cabinet
But before jump into the article let me introduce you this week’s special deals and offers.
If you want your studio monitor to work for a long time without any issues, you must deeply learn about the cleaning process.
Do you know, why this is an ultimate studio monitor cleaning guide? Because there is no other guide available on the internet which is as thorough and deep as it is.
So, let begin this guide.
How To Clean Studio Monitors: The Right Way
Disclosure: This post may contain affiliate links, which means we may receive a commission if you click a link and purchase something that we recommended. Read more about Affiliate disclosure here.
I have already warned you that cleaning studio monitor in a wrong way could permanently damage them. So I have written this thorough process. Do you know, why I was inspired to write this article?
Well, here is the incident which I would like to tell you that has happened to me when I was new in the recording field.
I had started my very first studio at my home in 2007. I researched well about the required equipment, purchased them and settled up my studio.
After a couple of months, I noticed some white fungus type material on the woofers in both of the monitors. I applied a partial wet towel to clean them. And that was my mistake.
The wet towel damaged my woofer cone as it was built of treated paper and I applied some extra pressure on it.
So, that was a terrible mistake in my career. The monitor was so expansive and the manufacturer didn’t cover that damage under their warranty.
But, that was my first and last mistake in caring for my recording equipment. I then researched a lot on the perfect process of cleaning them.
Cleaning a woofer cone
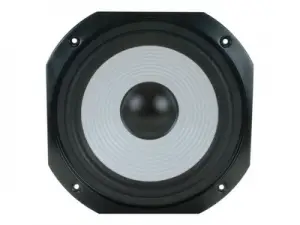
Before cleaning a woofer cone, you have to know about the parts of a woofer, as well as by which materials they are made of?
There are 5 parts of a woofer
- Woofer Cone
- Rubber Surrounds
- Dome
- Driver
- Magnet
Woofer Cone
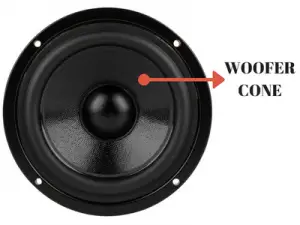
Woofer Cones are generally made of treated paper, Polypropylene, Aluminum, and Magnesium, Kevlar, Carbon Fiber etc.
These all are very hard materials and don’t get damaged during the cleaning process. But there are other parts too which are more sensitive then Cones.
Rubber surrounds

Rubber surrounds are the Cone surroundings used as a shock absorber when a sound generates and the Cone goes frontwards and backwards depending on the intensity of sound.
These are generally made of Butyl rubber which is very flexible and durable too. But as this is a type of rubber and flexible, you should take extra care throughout the cleaning process.
Dome
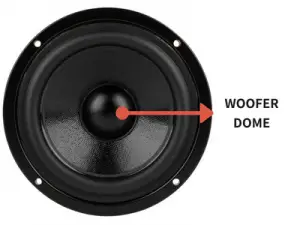
Dome is a circular part situated just at the centre of Cone. They are generally made of treated paper and the most sensitive part you should care for during the cleaning process.
Driver
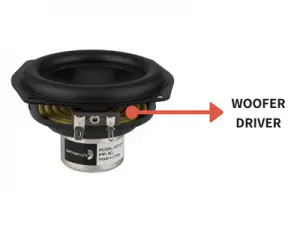
Drivers are the copper voice coils and situated just behind the Dome. It is surrounded by a magnet and the most important part of a speaker.
When electric current passed through this coil it pushes the speaker cone frontwards and backwards. This process is responsible to make the sound.
As the driver is situated behind the Dome, you don’t have to worry about it.
Magnet
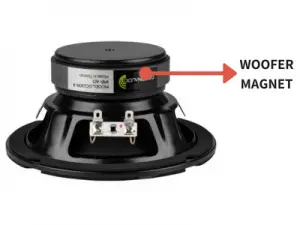
A magnet is also situated behind the Woofer Cone and you don’t worry about it during the cleaning process.
Now you are aware of the parts of you Woofer, its time to know the cleaning process without damaging your speakers.
There are 2 methods you can go through to clean your Woofer Cone.
Cloth Method
When you have minor dust on your woofer, you can use this method to clean them. You could also use the cloth method in wet cleaning. Wet cleaning is used to clean stain and fungus which grows with time, on the cone and rubber surrounding.
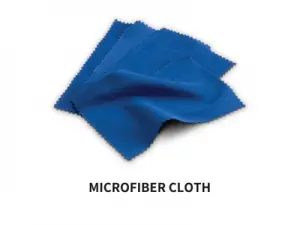
Take a smooth dry cloth like used in spectacles box.
Carefully rub this cloth against the cone and smoothly clean out the dust.
Don’t push with a much pressure nor it could destroy the cone. Also, keep in mind the dome is more sensitive and fragile so keep your fingers away from the dome.
If you apply pressure onto the dome, you would end up with a puckered dome.
Now, examine the dust.
If it is stain or fungus, probably it won’t go with dry cloth cleaning. You have to partially wet the cloth.
Now, if you have stain or fungus on your woofer dome, wet the cloth partially and rub smoothly against the dust spot. don’t apply much pressure. just do it smoothly.
When the dust will go, take another dry cloth and wipe out the cone smoothly.
Beware – Don’t keep your wet cloth away from the dome as it is generally made of treated paper, the water could harm this.
One more thing. If your woofer cone is made of treated paper don’t do the wet cloth method on this as it will negatively affect your speaker cone. Instead, only use dry cloth cleaning.
Brush and vacuum cleaner method
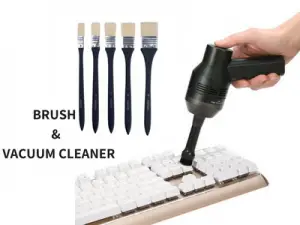
Brush and vacuum cleaner method is a pro method and requires a portable vacuum cleaner and extra smooth brush.
You can Check out the portable vacuum cleaner and extra smooth brush on Amazon.
Take the brush in one hand and the vacuum cleaner on the other hand. Rub the brush against the dust on the cone and side by side apply the vacuum upon the brush to pull out the dust from the surface.
If you spot a stain or fungus on the cone, apply some amount of water on the brush to partially wet. Then rub the brush carefully against the cone and use the vacuum cleaner to sock the dust.
Note: don’t apply the wet brush on the dome. The reason I told you above.
Woofer Dome Cleaning
If the woofer dome is made of the same material used in cone then you can use the same cleaning methods which I have described to clean the Woofer Cone.
But if you woofer dome is made of fragile material then don’t use those methods nor you will end up with a pushed dome.
Use your mouth instead. Blow the dust over the dome. If after blowing just would not go, leave it. Don’t do anything which could cause severe damage to your the dome.
Clean rubber surrounded the woofer cone
Rubber surroundings suffer a common problem with time. Their some area becomes white with time and looks ugly.
This is the sign of fungal reaction with the rubber. You can solve it to apply the technique that I will show you below, but keep in mind when these stains appear on the rubber soundings that means they are started to get distorted.
And the last step is to change them or you will go through a bad mixing experience.
They act like suspension support of the coil and the change in their suspension measured in micro level.
Distorted rubber surroundings create a micro level change in suspension and result in a change in sound permanently. This changed sound will affect your mixing.
So, if you spot a white spot on the rubber surroundings, try to change them.
Now, if you want to clean them instead, here is the process.
You need coconut oil to remove these stains. Apply some amount of coconut oil on the cloth and smoothly rub against the white stain. Then wipe with a dry cloth and you will see the stain disappeared.
Note – rubbing a cloth onto the rubber surroundings could change the alignment in a micro level that affects the sound. So do this at your own risk.
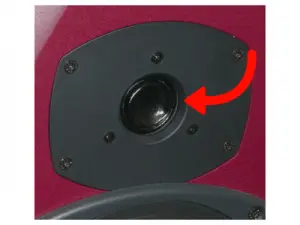
Tweeter cleaning process

Tweeter cleaning process is exactly the same as the Woofer Dome. As tweeters are the most fragile material in the whole speaker parts, don’t try to touch them. Don’t apply any vacuum cleaner or cloth cleaning method.
Instead, just blow out the dust by your mouth. If this process does not affect the dust, leave it as it is. doing extra effort to clean the dust will end up with a damaged tweeter dome.
I never recommend to touch by hand or apply any air pressure on the tweeter dome. If the dome would get deformed the sound would also go wholly unnatural.
How to fix Pushed Tweeter Dome
Children are very curious about the speaker domes and push them within a fraction of second before you notice the danger and stop them.
When this happens in your life you get very disappointed. And why not, after all a studio monitor is a very costly equipment in your studio.
But wait, I have a quick fix for this nightmare.
So, what it is?
Come closer to the dome, place your lips tightly around the tweeter to create a vacuum and increase the suction gently to suck it out.
But do this instantly after this accident nor it would not come back again. If you leave tweeter dome as it is for a while, the diaphragm settled down itself in this position and the rescue becomes almost impossible.
Though, there might still have small creases, folds, or dimples after the fix. And the sad part of this, we cannot do more on this. The sound may change slightly which could affect your overall mixing quality.
Prevention is better than cure – So prevent your speakers by this type of damages.
Wondered why Tweeter domes are not covered?
I know, a question is now arising in your mind.
If tweeter domes are too fragile to handle then why they are not covered in studio monitors?
The only reason behind this is covers add color to the sound. You can’t get the original sound with covered tweeters.
The main work of a studio monitor is to deliver an original sound. Any obstacle between the monitor and ears will change the sound quality.
So, the tweeters and woofers are not covered in them.
If you are worried about their safety just take them out of the reach form children or other facts which could harm them.
Cabinet cleaning process
Cleaning monitor cabinets are not as difficult as other parts. You can use a microfiber cloth just like Woofer Cone and rub against the cabinet surface to clean it.
You can also use a partially wet cloth to clean a stain from the cabinet.
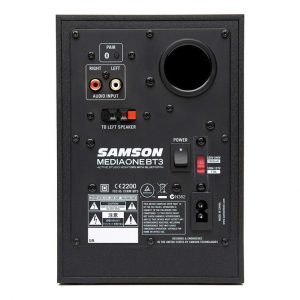
Keep in mind that all switches are off and plugs are out before clean the monitor. The backside of the cabinet has input/output sockets and volume knobs etc.
If you are using a wet cloth to clean the backside, dry this too using a dry cloth.
Don’t use the vacuum cleaner to cleans the dust from the bass reflex hole.
If you apply vacuum cleaner into this, it will damage the inner parts of your studio monitor. Instead, use cloth gently to clean the dust.
Fixing a scratch on the cabinet

Well, fixing a scratch is not exactly possible if you don’t know by which materials your cabinet is made of. There are some hopes if the scratch is small. you can use the same color marker pen to color the scratch area.
Using a marker pen can hide the scratch to some extent. But you can’t hide a big scratch with a marker.
If your monitor has a big scratch on the cabinet, I recommend you to contact your dealer to fix that or simply leave it as it is.
Don’t worry scratch don’t affect in the sound delivery of an audio monitor unless the cabinet is not broken.
Do’s and Don’ts when cleaning your Studio Monitors
Do’s
- Switch off all the power switches connected to the monitor and plug out the power cable.
- Use microfiber cloths only.
- Use desktop cleaning vacuum cleaner only.
- Only use coconut oil for cleaning the white spots on the rubber surroundings.
- Use the same color marker pen to color out the cabinet scratch.
Don’t
- Don’t apply wet cloths when power is on or you would face severe electric shock.
- Use only mouth suction to fix out the tweeter dome. Don’t use a suction cup or vacuum cleaner to do this process. It could damage your tweeters permanently.
- Don’t use wet cloths if the Woofer cone or dome is made of treated paper. It could damage them. Before applying wet cloth on them check out the material used to make them.
- Don’t use any oil or solution other than coconut oil. Using other solutions could severely damage the rubber surroundings.
- Don’t use the vacuum cleaner to clean the bass reflex hole as it could damage the inner components and materials.
- If the scratch is big in on the cabinet, don’t use a marker. Using marker could make them look ugly. Anyone can spot that you used a marker to hide that scratch. It would be better to leave it.
Conclusion
Now you are aware of the right process to clean your studio monitors. It’s time to clean your monitor. Use these methods to clean your monitor like a pro.
If you have a query about any point in this article, the comment box is waiting for you. Comment below and I will grateful to solve your queries.
Use the social share buttons below and share this article on your social circle. This article helps them out to clean their studio monitors as well as normal speakers.
Feel free to check out my Studio Monitor recommendation here
Read also,

![Heritage Audio i73 PRO Series Audio Interfaces Review [2024]](https://www.recordingbase.com/wp-content/uploads/2024/01/Heritage-Audio-i73-pro-series.jpg)


I definitely wanted to make a word in order
to say thanks to you for all of the splendid advice you are writing at this site.
My extensive internet investigation has finally been paid with pleasant content
to talk about with my relatives. I would tell you that we visitors
actually are very endowed to live in a good site with
many perfect people with great solutions. I feel pretty happy to have discovered the web pages and look
forward to so many more excellent minutes reading here.
Thanks a lot once more for all the details.
Wonderful post! We are linking to this great article on our site. Keep up the great writing.
Thanks a lot Angela
Thanks bro keep it up I did try it worked for me salute