In this guide, you will learn how to build a floating floor for a recording studio. If you are looking to soundproof your home studio then you should read this step-by-step guide till the end.
You may be wondering why someone would want to build a floating floor for a recording studio.
Well, there are a few reasons.
A floating floor can provide acoustic treatment for a recording studio, and it can also help to reduce noise transfer between rooms.
So, if you’re planning on building a floating floor for your recording studio, but don’t know how to and where to start then this step-by-step guide on “how to build a floating floor for a recording studio” is for you.
You must also read my guide, “The Ultimate Guide To Acoustic Treatment For Home Studios” to get a better understanding of soundproofing and acoustic treatment in the recording studios.
So, let’s begin building our floating floor.
Table of Contents
How to Build a Floating Floor for a Recording Studio
First off,
Disclosure: This post may contain affiliate links, which means we may receive a commission if you click a link and purchase something that we recommended. Read more about Affiliate disclosure here.
What is a Floating Floor?
A floating floor is a type of floor that does not sit directly on the ground or on a subfloor. Instead, it is suspended on a system of joists or trusses.
This type of flooring is often used in recording studios, as it can help to reduce noise transfer between rooms.
It is also used in homes to reduce noise from foot traffic.
There are two main types of floating floors:
Suspended Floating Floors
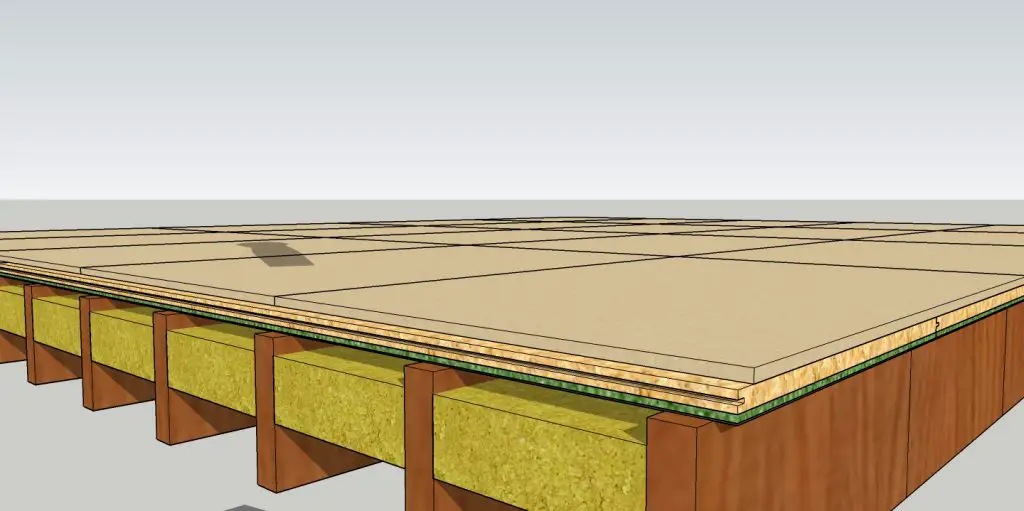
A suspended floating floor is a type of floor that is supported by a system of joists or trusses. The floor is not attached to the joists or trusses but is instead suspended from them.
This type of floor is often used in recording studios, as it can help to reduce noise transfer between rooms.
Suspended floating floors are typically made from wood or metal, and they can be finished with a variety of materials, including carpet, tile, and vinyl.
2. Floating on springs
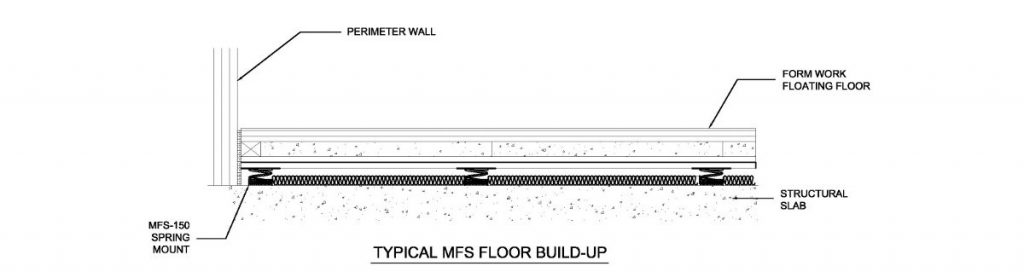
The second type of floating floor is one that is supported by a system of springs. This type of floor is often used in homes, as it can help to reduce noise from foot traffic.
“Floating on spring” floors are typically made from wood or metal, and they can be finished with a variety of materials, including carpet, tile, and vinyl.
Advantages of Floating Floors
There are a number of advantages to using floating floors in recording studios, including:
- Improved Acoustic Performance: Floating floors can help to improve the acoustic performance of a recording studio by absorbing sound and reducing noise transfer between rooms.
- Reduced Noise Transmission: Floating floors can also help to reduce noise transmission between rooms by isolating the sound within the room.
- Increased Structural Stability: Another advantage of floating floors is that they can help to increase the structural stability of a recording studio by distributing weight evenly.
- Easy to Install: Floating floors are relatively easy to install, and they can be installed over a variety of existing flooring materials, including concrete, wood, and carpet.
- Affordable: Floating floors are an affordable option for recording studios, and they can be purchased for a fraction of the cost of other types of flooring.
Disadvantages of Floating Floors
There are a few disadvantages to using floating floors in recording studios, including:
- Limited Life Span: Floating floors have a limited life span, and they will eventually need to be replaced.
- Requires Maintenance: Floating floors also require regular maintenance, and they must be cleaned and protected from moisture.
- Not Suitable for All Studios: Floating floors are not suitable for all studios, and they may not be appropriate for studios that are located in areas with high humidity or moisture levels.
How to Build a Floating Floor
Now let’s come to the point.
Building a floating floor for a recording studio is not a difficult task, but there are a few things that you need to keep in mind before you start.
This video will help you to understand how to install floating for a recording studio.
Here are the steps that you need to follow to build a floating floor for your recording studio:
1. Choose the right material:
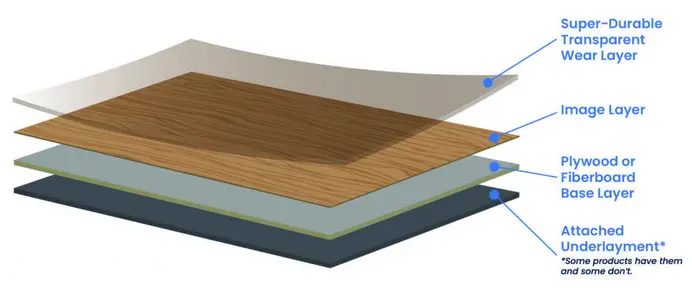
The first step is to choose the right material for your floating floor. There are a number of different materials that can be used for floating floors, but the most popular choice is wood.
Wood is a good choice for floating floors because it is strong and durable, and it can be finished with a variety of materials, including carpet, tile, and vinyl.
2. Choose the right thickness:
The next step is to choose the right thickness for your floating floor.
The thickness of your floating floor will depend on the type of material that you choose, but it is generally recommended to use a thickness of at least 1 inch (2.54 cm).
3. Cut the material to size:

Once you have chosen the right material and thickness for your floating floor, you need to cut the material to size.
You can do this yourself with a saw, or you can have the material cut to size at a local hardware store.
4. Install the underlayment:
The next step is to install the underlayment. The underlayment is a layer of material that is used to protect the floating floor from moisture.
There are a number of different types of underlayment, but the most popular choice is polyethylene foam.
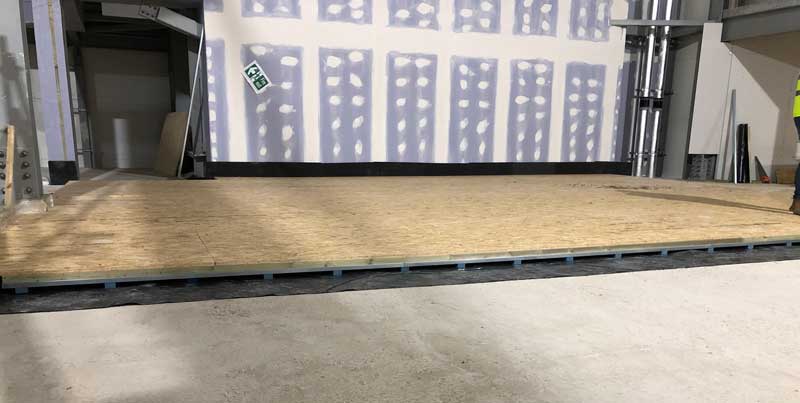
5. Install the floating floor:
Once the underlayment is in place, you can begin to install the floating floor.
The first step is to lay down a layer of material, such as plywood, that will serve as the base for the floating floor.
Once the base is in place, you can begin to install the floating flooring material.
6. Finish the floor:
Once the floating floor is installed, you need to finish the floor. The most popular choice for finishing a floating floor is carpet, but you can also choose to finish the floor with tile, vinyl, or hardwood.
Conclusion
Floating floors are a great choice for recording studios, and they offer a number of advantages, including increased structural stability, easy installation, and affordability.
However, there are a few disadvantages to using floating floors, including a limited life span and the need for regular maintenance.
If you are considering installing a floating floor in your recording studio, be sure to follow the steps outlined above to ensure that the floor is installed properly.
And let me know in the comment box if you have any queries about the floating floor. It will be my pleasure to answer all your queries.
FAQs About Floating Floors
How do you float a floor in a recording studio?
To float a floor in a recording studio, you will need to choose the right material, cut the material to size, install the underlayment, and then install the floating floor. You can then finish the floor with a variety of materials, including carpet, tile, vinyl, or hardwood.
Why use a floating floor in a studio?
There are a number of reasons to use a floating floor in a studio, including good soundproofing ability, increased structural stability, easy installation, and affordability. However, there are a few disadvantages to using floating floors, including a limited life span and the need for regular maintenance.
What type of flooring is best for a music studio?
There is no definitive answer to this question as there are a number of different types of flooring that can be used in music studios. However, some of the most popular choices include carpet, tile, vinyl, and hardwood. Each type of flooring has its own advantages and disadvantages, so it is important to choose the right type of flooring for your specific needs.
What would be the design of the floor in a recording studio?
The design of the floor in a recording studio can vary depending on the specific needs of the studio.
How do you soundproof a floating floor?
There are a number of different ways to soundproof a floating floor, including using an underlayment, installing soundproofing material between the joists, and using a soundproofing sealant.
How much does it cost to build a floating room?
The cost of building a floating room can vary depending on the size of the room, the materials used, and the specific needs of the studio. However, floating rooms typically cost between $1,000 and $5,000.
Is wood floor good for acoustics?
Wood floors are a good choice for acoustics because they absorb sound. However, there are a number of different types of wood floors, and each type has its own advantages and disadvantages.
Related,