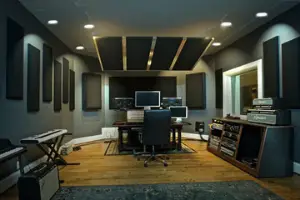
Acoustic treatment is an integral part of any recording studio.
But this is the thing newbies underestimate in recording studios, that is Acoustic Treatment. They marginalize it over other recording gears.
They think that if they have a good audio interface and condenser mic so they can record anything like professional studios.
But that’s not true at all.
Whether you have a tiny bedroom studio or a standard home studio, you need proper acoustic treatment for it.
Otherwise, in every step of the recording process, you are not going to get the expected results. And after several months of frustration that why your recording sucks, you will realize that your room is not properly acoustic treated.
So, it’s better to avoid those annoying months filled with frustration.
Don’t worry, you don’t need fully professional acoustic treatment materials like professional studio which is out of your budget.
Disclosure: This post may contain affiliate links, which means we may receive a commission if you click a link and purchase something that we recommended. Read more about Affiliate disclosure here.
There are several free and budget-friendly acoustic treatment stuff available on the internet, on your local store and in your home.
You just need the knowledge – what works?
In this tutorial I’m will give you a better knowledge of acoustic treatment, and guide you in choosing the right stuff for your recording studio.
Just be with me,
Ready? Now let’s begin.
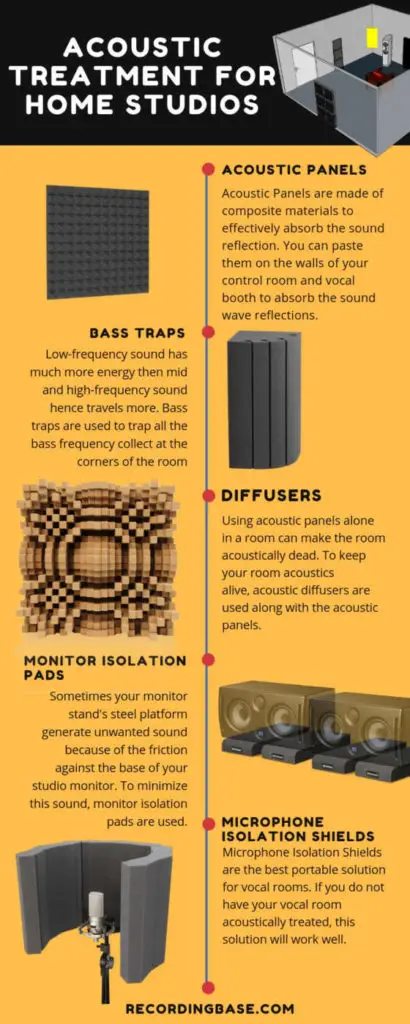
Table of Contents
- 1 What is Acoustic Treatment
- 2 How to Evaluate Your Room for Acoustic Treatment and Soundproofing
- 3 Components Used for Acoustic Treatment and soundproofing
- 4 3 All in one Packages for Acoustic Treatment
- 5 3 energy Points in a Room
- 6 The Setup
- 7 Household Alternatives for Pro Acoustic Components
- 8 Conclusion
What is Acoustic Treatment
However, acoustic treatment is a vast field of science and covering all the things will make me(and you) an acoustic engineer, you don’t need all of them.
You just need some basic concepts to run your recording studio.
Here are these concepts which you need to know as a home studio owner.
How Sound Travels in a Bare Room
To implement the right acoustic treatment in your home studios, you need to know how sound travels inside a room.
Let us understand the path of sound in a room,
- When a sound made, it starts to travel all direction.
- As it travels in all direction, some portion of it enters into the microphone directly like a straight line.
- The remaining sound energy collides with the surface of the walls and other materials existed in the room and bounce randomly.
- Your mic catches those reflections after few milliseconds and you hear a room ambience mixed with the original sound.
The same thing happens in your control room where you monitor and mix your projects. Whenever a sound produces in your control room you hear 2 variations of sound.
- The direct sound that travels towards your ears in a straight line.
- The reflected sound that occurs due to the bounces of the remaining sound energy in the room and then comes to your ears.
The direct sound which enters into your ear does not interact with the room walls so its in pure form. and its frequency spectrum remains the same as real sound.
But, the reflected sound which comes through room walls and other materials, lose its dynamics and original frequency spectrum. As well as the time it comes to your ear is different from the direct sound.
So, each reflected sound has the potential to change the character of the direct sound slightly.
The “potential to change the character of the direct sound” always depends on the size, shape and the materials used in the room.
Sometimes this change is good, sometimes it’s bad.
We call it Room Reverb
We actually need reverb in our recordings but why we generally avoid the original room reverb in recording studios and run towards the virtual reverb units/plugins? Why we treat recording studio acoustics to minimize the room reverb?
Here is the answer.
Why Room Reverb is not Good?

Because the kind of reverb which we need in our recordings generally could not be produced by an average size room.
If we need god reverb then we have to build a cathedral type rooms which is impossible for a home recordist.
Cathedrals or churches are designed to produce good reverbs which is when added to the original sound sounds pleasant.
- Opposite to cathedrals and churches, an average size room has unbalanced sound reflections which cause an unpleasant reverb effect.
- The second and more important reason is, we can’t control the original room reverb’s amount and characteristics.
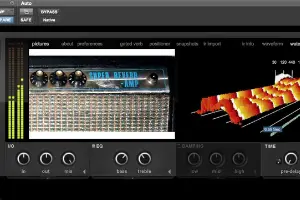
On the other hand, with reverb units and plugins, we can easily control and design the amount and characteristics of reverb respectively.
Let us understand the Fake reverb aka Reverb plugins.
Simulate The Room Tone: Reverb Effect Plugins
Actually “faking reverb” is not new for us. It’s in trend from around the 1960s when someone invented the echo chambers. However, that machine was very big in size.
Then plate reverb was invented and came into a trend. Those were lighter than echo chamber machines.
In that machine, metal plates were used to simulate the reverb tone of the room. Soon after invention, it had captured the market due to its pleasant tone.
After then, reverb and delay units were invented. They were handier then plate reverbs.
And now, we have reverb plugins which are capable to simulate any type of reverb.
But reverb plugins are only going to work when you have removed natural room reverb from your studio.
Here’s how?
How to “Remove” Natural Room Reverb
Have you ever noticed some cool looking panels on the walls of recording studios?.
Those panels are used to absorb the sound reflections so that the mic could only record the direct sound, not reflections.
There is a combination of different type of materials used to absorb the reflections such as,
- Bass Traps
- Acoustic foam panels
- acoustic mats
- acoustic curtains
These absorbers are used along with sound diffusers to get the best results.
Wondering what is sound diffusion and how does it work?
Here the answer…
Sound Diffusion: The Concept

When you use acoustic panels to absorb all the reflections what you get is dead energy-less sound which is not a good sign for recording studios.
In terms of acoustics, these kinds of rooms are called dead rooms. A dead room is not suitable for any kind of audio recording application.
So what’s the solution?
Using diffusers along with the acoustic panels.
Diffusers save some amount of reflections and scatter them in other directions. These scattered reflections are different from the normal reflections which you get in a bare room.
Normally in an untreated room the natural reflections trapped in one spot in the frequency spectrum and create problems. when you record and amplify some frequencies while cancelling out others.
In a bare room, natural frequency gets destroyed by the reflections.
On the other hand, diffusers scatter the reflection in other directions and nothing gets trapped. As a result, the natural room tone will be preserved and the room becomes alive(not dead).
If you use absorbers and diffusers in the right way then you will get a world-class recording in any home studio.
There is a misconception that soundproofing and acoustic treatment are the same things. But it’s not correct. Here is the difference between both of them.
Difference Between Soundproofing and Acoustic Treatment
Though this guide is all about acoustic treatment, I have used the term soundproofing here, because I know newbies often treat both of them as the same thing.
So, to clear up the differences between both of them I had to write this section on soundproofing.
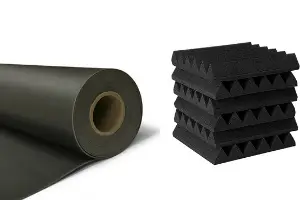
- Soundproofing is the process to minimize the level of sound by blocking the gaps in the room with certain kind of dense materials such as sealing up the windows and doors with plywood, rubber strips, double layered glass etc.
- While acoustic treatment is the process to control the room reflections for better recordings.
Both of them are a valuable process for a recording studio.
Where soundproofing gives you the freedom to record without worrying about the neighbours, acoustic treatment makes the room sound recording friendly.
You can say soundproofing as a part of the acoustic treatment plan.
But, to get your room soundproof and acoustically treated you need to evaluate your bare room.
How to Evaluate Your Room for Acoustic Treatment and Soundproofing

There are tons of acoustic treatment stuff available in the market.
Without evaluating your room choosing the right acoustic treatment stuff is not possible which most of the newbies normally skip for the sake of knowledge.
As soon as they listen about the acoustic treatment, they immediately go out and buy wrong stuff without knowing the fact that what kind of acoustic problem their room has?
By evaluating your room you can save your hard cash.
So, how to do it?
walk around each and every spot in the room and clap your hands as loud as you can and observe the reverb you get. Two scenarios will create in this process.
- Scenario 1 – harsh metallic ringing reverb which generally occurs in small cube shape rooms.
- Scenario 2 – A pleasant reverb which generally occurs in big rooms with a lot of diffusive surfaces.
Now evaluate the sound with scenario 1 and scenario 2.
- If your result of the evaluation process is closer to Scenario 1 you need a lot of absorbers and diffusers to dry out the unpleasant ringing reverb.
- If your result is closer to Scenario 2 then you don’t need a much acoustic treatment in your room.
Its fully practical process to evaluate your room how much acoustic treatment it needs.
When you start to install the absorbers and diffusers, with each new addition evaluate the acoustics with the clap test.
With each new addition, the unpleasant ringing reverb will become less prominent. As soon as you get the sweet pleasant reverb tone, stop there.
Now your room is perfectly acoustic treated.
and its time to know some component of acoustic treatment…
Components Used for Acoustic Treatment and soundproofing
There are several types of absorption panels and diffusers available in the market to choose from.
Some of them are,
- Acoustic Panels
- Bass Traps
- Wooden Diffusers
- Acoustic Mats
- Acoustic Curtains
- Monitor Isolation Pads
- Microphone Isolation Shields
- Soundproofing Doors
Let us understand them one by one…
Acoustic Panels
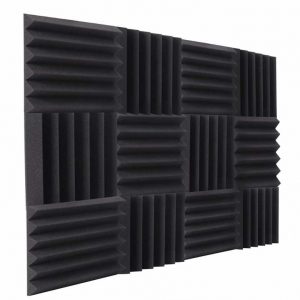
Acoustic panels are not just foam panels. They are made of composite materials to effectively absorb the sound reflection. You can paste them on the walls of your control room and vocal booth to absorb the sound wave reflections.
They come with various shapes from a triangular pyramid shape to egg crate shape. The triangular shape is the most popular shape in acoustic panels. They are very effective as well as cheaper than other shapes.
You can buy acoustic panels in different sizes like 1′ X 1′, 2′ X 2′, 1′ X 4′ etc.
It all depends on you and your studio’s architecture that which sizes will fit in. However, the
1-foot square size fits in all situations. I prefer to use them.
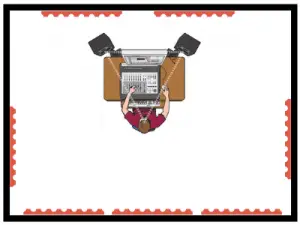
Have a look at this acoustic panels diagram for control rooms. This diagram can help you to get an idea of where to put them in your room.
Check out my Recommended Acoustic Panels
Bass Traps
Wondering, if acoustic panels are able to absorb the sound reflections then why bass traps?
Here’s the answer. Low-frequency sound has much more energy then mid and high-frequency sound hence travels more.
Generally, in a room, all the bass collects at the corners.
You can simply observe this phenomenon by playing a beat and come closer to the corners. You would feel that at the corners you observe more bass than other areas of the room.
Added bass severely affects the room acoustics. And the bad news is, acoustic panels are not capable to stop this effect.
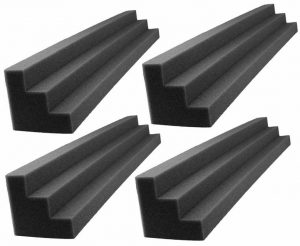
Well, thanks to that acoustic engineer, who invented bass traps to trap all the bass frequency collect at the corners of the room. Bass traps are a triangular shaped composite of foam and some other materials which can effectively trap the bass.
So, how to use the bass traps? See the diagram. You will be clear.
Check out my Recommended bass traps
Diffusers
As you have read above, using absorbers alone in a room can make the room acoustically dead.
Many folks don’t realize that and use tones of absorbers without any combination of diffusers. They think of that adding some virtual reverb can make the recorded sound alive. Although, it will work a little but not much.
To keep your room acoustics alive, I strongly recommend using acoustic diffusers along with the absorbers.
However, It’s totally up to you that you will use it or not.
Because they are expansive in comparison to the foam absorbers. Here are the recommendations which I used in my studio.
Acoustic Mats
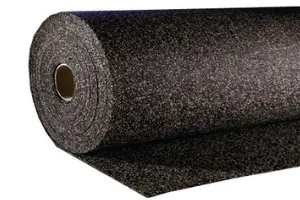
With abortion panels, bass traps and diffusers we can cover the walls and ceiling of the room but what about the floor.
We can’t cover the floor with foam panels.
So, a new type of mat is invented which can style your flooring as well as works as acoustic stuff. It absorbs the sound reflections goes towards the floor area.
However, using acoustic mats is optional. Use it if you can afford it otherwise it doesn’t affect a lot on the room acoustics. You can also use normal mats in place of acoustic mats.
But if you are capable of buying one, definitely go with,
Acoustic Curtains
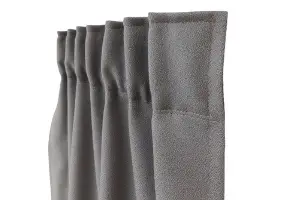
Acoustic curtains can do magic.
In most of the theatres and cinema halls, you will find them.
They are made of special fabrics which can help in absorbing the sound reflections in a great way along with giving your recording studio a professional look.
Acoustic curtains are not capable of traping the low-frequency sound waves but for mid and high frequency it’s a good choice.
Using them along with other acoustic treatment stuff can be very effective.
Monitor Isolation Pads
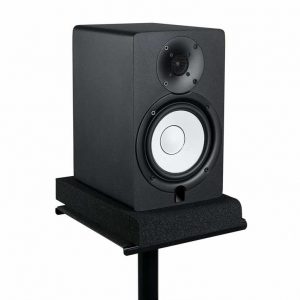
Sometimes your monitor stands steel platform generate unwanted sound because of the friction against the base of your studio monitor. Avoiding this sound could affect your mixing experience. So, it’s better to use Monitor Isolation Pads to cut off the contact between surfaces.
Monitor Isolation Pads are made with foam composite to absorb that annoying noise.
Here are my recommendations,
Now come to door packing…
Check out my Recommended Monitor isolation pads
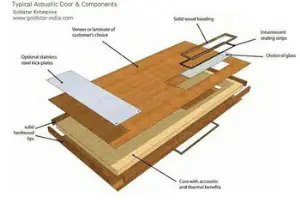
Soundproofing Doors and Windows
Do you want to disturb your neighbours?
No?
Then your doors and windows must be soundproofed to prevent the sound coming out of the room.
If you are going to establish your home studio in an old room, probably you have a simple door. Such doors are not soundproofed. So, there are 2 ways to make your studio door soundproof.
- Using soundproofing materials on the doors and windows.
- Or replacing the door and windows with a specially treated door made with soundproofing material.
No 1 – Using Soundproofing materials to cover the doors and windows.
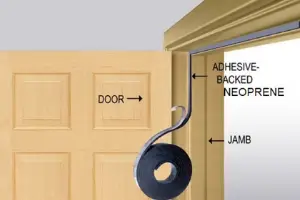
If you don’t want to replace the existing doors and windows then you have to treat them with soundproofing materials.
Here is those stuff which you can use to treat your doors and windows.
No 2 – Replacing existing ones with soundproof doors and windows.
If you are capable of replacing your existing door and windows then here is the best product by Auralex
How to use Glass in Acoustic Treatment
Glass panels are the common material in recording studios.
We need to fix glass panels between the control room and vocal room to interact with the vocalist/musician.
The bad news is glass panels have highly reflectable surface. That means all the sound collides with a glass panel will reflect.
So how can we use them in the right way so that the reflection could be minimized?
Here’s a solution…
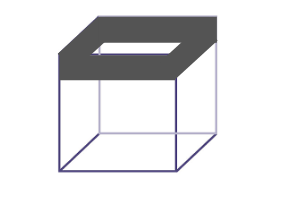
Make sure there should be two glass panels used parallel and these two glass panels should be slightly inclined to scatter the sound reflections away from your ears.
See the image below

Inclined glass panels keep the reflection away from your ears and don’t effect on your mixing and monitoring.
3 All in one Packages for Acoustic Treatment
Buying and implementing all the acoustic treatment stuff individually is really hard work as well as guesswork.
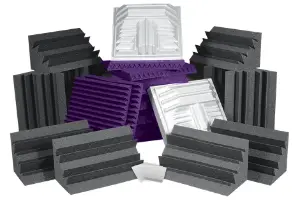
So, some acoustic companies like Auralex and Primacoustic offer complete acoustic packages for rooms to avoid the guesswork.
I have 3 recommendations from these companies which you can buy to simplify the process.
1 Auralex Roominators Pro Plus Kit
In recent years Auralex made a huge market because of the quality they give.
In fact, Auralex is the best brand in the acoustic treatment market. Several pro studios, theatres etc are using Auralex products.
They have a standard package for home studios.
- Auralex Roominators Pro Plus Kit.
The package includes
- 36 Studiofoam 2″ Wedge Panels
- 8 T’Fusor 3D Sound Diffusors
- 12 LENRD Bass Trap
- for mounting – EZ Stick Pro Adhesive Tabs
Checkout: Auralex Roominators Pro Plus Kit
2 Auralex SFS-184 SonoFlat System

Auralex has one more package for the home studios – Auralex SFS-184 SonoFlat System.
If you don’t like the traditional look of standard foam panels then you should definitely try this package.
It has sleek looking stuff which can give your studio a stylish look along with the best acoustic treatment.
These are the items included in the package:
- Thirty-Two 2′ x 2′ x 2″ SonoFlat Panels
- Six Q’Fusors
- Eight SonoCollars
- Tubetak Pro for mounting
- Eight 12″ x 6″ x 28″ SonoColumns
Check it out:
3 Primacoustic London 12
The number one acoustic treatment company Primacoustic offer tons of solutions for home studios.
But the best one is a home studio package called Primacoustic London 12 which is awesome.
It includes:
- Eight 12″ x 48″ x 2″ Columns
- Two 24″ x 48″ x 2″ Broadband Panels
- Twelve 12″ x 12″ x 1″ Scatter Blocks
- As well as various mounting hardware
Checkout:
3 energy Points in a Room
When your acoustic treatment stuff has arrived the most common question will come to your mind is
how would you use them in your room?
Read on…I will show you the right method.
Ist off…
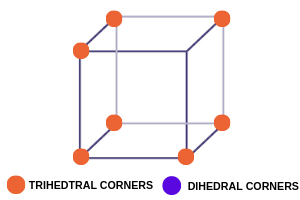
You need to know that each room has some energy points where the sound energy gathered.
these points are
- Trihedral corners
- Dihedral corners
- And the Walls.
Trihedral corners
Trihedral corners collect the most energy out of all 3 points. So the first step you need to take is shut them down with bass traps.
At any trihedral corner, there are 3 wall coverages join together. that means a sound wave which reflects 1X on the walls, reflect 3X on the trihedral corners.
So, the first priority is to trap the trihedral corners in the room.
Dihedral corners
As dihedral corners reflect 2X more than walls but less then trihedral corners, you can give them 2nd priority after trihedral.
The Walls
Finally, when you’ve covered the trihedral and dihedral corners you can now cover the walls. As the walls have only one dimension they are not as effective as others in terms of acoustics.
The Setup
I know you have a question in your mind that how to set up the acoustic panels in the room?
Well, here are the 4 step setup process which you can follow to setup them like a pro.
Step 1

First of all, we need to cover up the trihedral corners which are the most effective parts in a room.
Bass traps are the great solutions for covering up the trihedral corners as they offer a wide range of absorption.
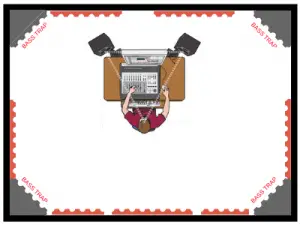
So at the very first, you should mount bass traps on the trihedral corners. The image will show you how to mount them correctly.
Step 2

When you have covered all the trihedral corners in your room come to dihedral corners. These corners are the second most effective corners in terms of acoustic treatment.
Now mount some of the acoustic panels on the dihedral corners as shown in the image. Bend the panels and cover up some area of dihedral corners with them.
Make sure you have a free space between the panel and the corner to absorb the low frequency as well.
Step 3

Now come to the third step.
In the third step, you should cover the walls. For this, you need acoustic panels again. Mount them as shown in the image. Make sure the panels should not be mounted at the same place on the opposite walls.
Step 4
Now where to use diffusers?
Since in every room, most of the reflections occur on the upper portion of the walls in rooms with high ceilings.
So the best place to use the diffusers is
- The upper dihedral corners of walls at the ceilings.
However, in smaller rooms, the diffusion is not as effective as in larger rooms. So if you have a small room you can skip this step because you don’t need diffusers at all.
Household Alternatives for Pro Acoustic Components
Have you already spent your money on other recording stuff?
Don’t worry…
You can still make your recording studio acoustics better even with some household items.
Many of us take acoustic treatment granted and invest most of our budget on other recording stuff like audio interfaces, mics, computers etc.
After then when we record in a bare or poorly room, we realize how important is an acoustic treatment for recording studios.
But now we do not have much money to buy acoustic treatment products like Primacoustic London 12 or Auralex SFS-184 SonoFlat System.
Well, this DYI section is for them who already spent their money on the other stuff.
Close Miking Method

This method is very effective for poorly treated rooms.
You just need to place the mics as close to the object as you can without ruining the quality of the sound. By placing the mic closer, you can decrease the reflected sound and increase the direct sound.
However, this method has limitation such as
- The sound is not as great as in a good acoustic room.
Dynamic Mics
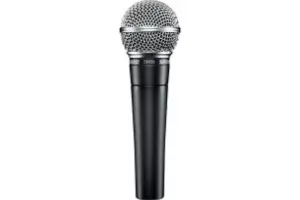
Dynamic mics are the best option if you don’t have good acoustic treatment.
They are specially built for the concerts PA applications where all type of noises is common. With “less sensitive” diaphragm they don’t catch the background noise as well as the reflections.
This method has also limitations like
- You don’t get the full spectrum of the sound in recordings which is helpful in better mixing.
Household Sound Absorbers

Household items like,
- pillows
- blankets
- couches
- or even clothes
are the god absorbers as effective as acoustic foams…
I think you have plenty of these stuff in your home which you can use for effective absorption of the reflections.
These might not look as professional as acoustic panels and diffusers but work well if used correctly.
Mattress Vocal Booth
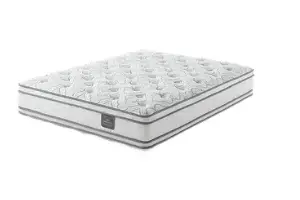
Since blankets and couches are not very effective in low-frequency absorption, you can use old mattresses for this purpose.
These are the good alternatives of bass traps.
Even you can mount them just against the vocalist in the vocal room for good low-end absorption.
However, there are some precautions when using mattresses in vocal rooms.
- Always use heavy core mattress, not the light inner-spring mattress.
- Do put the most sensitive side of the mic towards the mattress to minimize the incoming reflections.
Mic Isolation shields: Reflection Filters
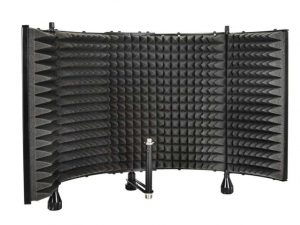
It’s the best portable solution for vocal rooms.
If you do not have your vocal room acoustically treated this solution will work well.
Just like acoustic panels, they are made of foam composites. They come in various shapes including triangular and pyramid.
You can attach these reflection filters to the mic stand against the vocalist to absorb the direct vocals.
Mic isolations pads are very useful for poorly acoustic vocal rooms. Although you can use them with your acoustically treated room too.
The benefits of using mic isolations shields are
- They are far cheaper than acoustic treatment
- Mic isolations pads work great
- They are portable
However, traditional mic isolation filters are not capable of absorbing the room acoustics totally. So I have researched a lot and come with a great Product – ISOVOX Portable Vocal Booth which is able to absorb the whole room noise by covering the singer from all directions.
Here it is.
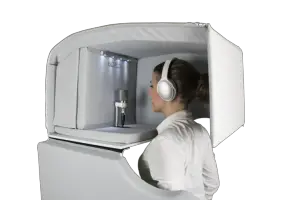

If you have a vocal room full of noise then you should try this out.
Conclusion
Well, here I am ending this guide.
Covering up all the aspects of acoustic treatment in this guide, I hope you got the right knowledge of acoustic treatment in recording studios and will apply in your studio too.
If you have any question regarding acoustic treatment do comment below. I will answer.
Also, if you have some good acoustic treatment ideas, tell us in the comment section below. It will help our readers a lot.
Share this guide with others on social media.
You may also like,


I found it interesting when you said that there are reverb units and plugins that can allow you to easily control and design the amount of reverb in a room. My husband and son want a music studio at home where they can play music together. Since we are unsure how we could achieve a studio with a good reverb, it will be best for us to hire an acoustical consulting company.